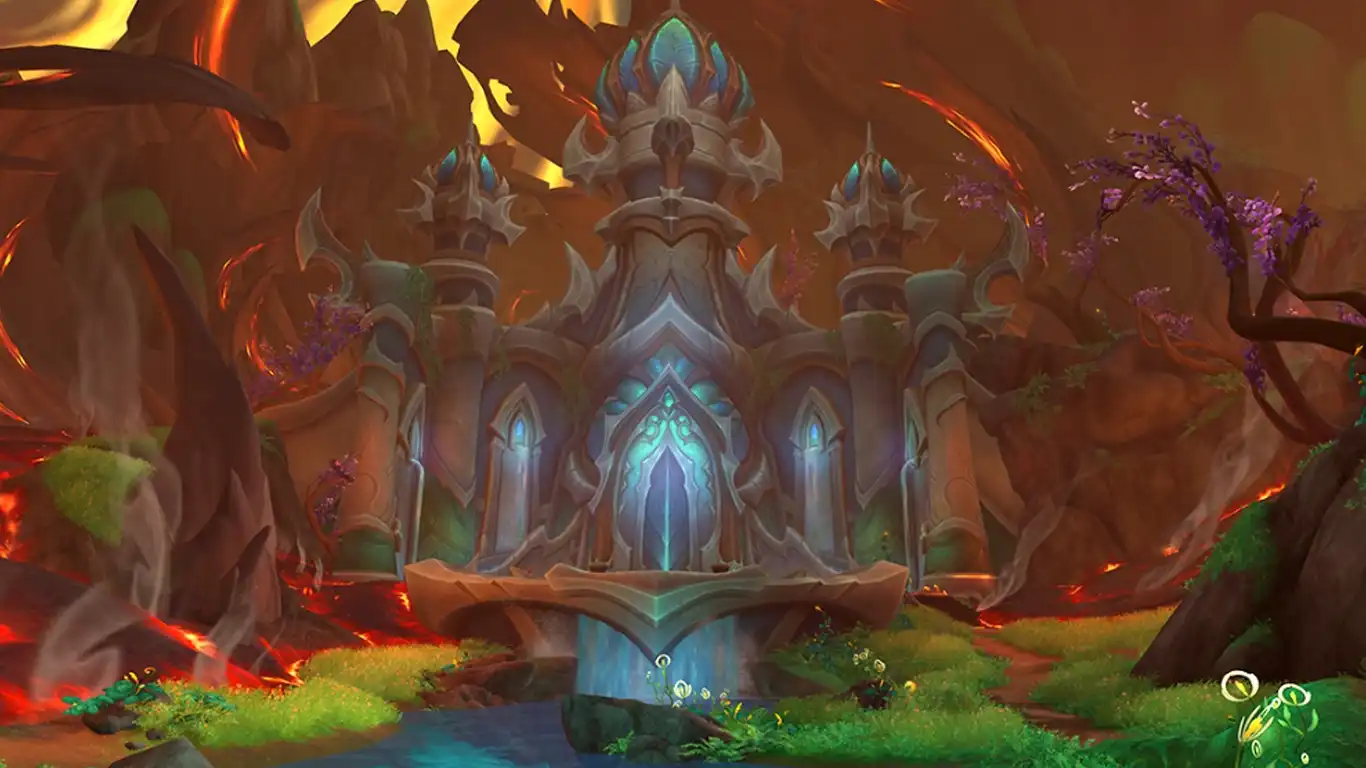
Dragonflight Patch 10.2 – Amirdrassil, The Dreams Hope Raid Guide
Amirdrassil, The Dreams Hope General Information
- Raid: Amirdrassil, The Dreams Hope
- Entrance: Emerald Dream at 27/31
- 9 Bosses in the Raid
- Itemlevel Reward: 441-496
- Special Features:
- Class Tier Sets
- Dragonriding Customization: Renewed Proto-Drake: Embodiment of the Storm-Eater
- Bosses can drop “Very Rare” Items with elevated Itemlevel
Opening Times
| November 14 | Normal, Heroic, Mythic, Raidfinder Wing 1 (Gnarlroot, Igira, Smolderon) |
| November 21 | Raidfinder Wing 2 (Volcoross, Larodar) |
| November 28 | Raidfinder Wing 3 (Council, Nymue) |
| December 12 | Raidfinder Wing 4 (Tindral, Fyrakk) |
First Boss: Gnarlroot
Notable Abilities
- Shadowflame Cleave is a frontal cone in the direction of a random player.
- Soak the Searing Bramble, but never twice in a row, and touch the Doom Roots in Phase 2.
Changes in Heroic Mode
- Tainted Lasher only activate after getting hit by Controlled Burn, or at the Start of Phase 2.
Phase 1
 Flaming Pestilence and Tainted Lasher
During Phase 1, Gnarlroot will cast Flaming Pestilence which spawns swirlies on the floor that deal damage to players struck by it.
Some of these swirls will spawn a Tainted Lasher.
These Lashers must be tanked, and inflict a stacking bleeding debuff.
In Heroic, these Lashers are dormant, and only awaken if hit by Controlled Burn.
 Controlled Burn
Few players will be affected by Controlled Burn, creating a 15-yard circle around them.
Other players in this range will take damage as long they remain inside of it.
Upon expiration, players drop a large zone of Shadowflame Scorched Earth.
 Shadowflame Cleave
Every 30 seconds, Gnarlroot will cast Shadowflame Cleave.
This is a frontal cone in the direction of a random player.
Tortured Scream
Gnarlroot frequently uses Tortured Scream, dealing heavy damage to all players.
This also applies a damage over time debuff for 10 seconds on all players.
Dreadfire Barrage
Every 20 seconds, the Boss casts Dreadfire Barrage on the current active Tank.
This deals damage, and applies a debuff that increases Shadowflame damage taken by 24% for 34 seconds.
Tanks should taunt after 1 stack.
Phase 2
In Phase 2, Gnarlroot becomes almost immune to damage due to Potent Fertilization, and casts Doom Roots. This Phase ends when all Roots are destroyed.
 Searing Bramble
Large swirlies appear in each quarter of the room that have to be soaked by players.
This applies a heavy debuff to them, and players should never soak twice in a row.
If players touch any Doom Roots while having this debuff, they burn the Roots.
Toxic Loam
During Phase 2, Gnarlroot uses Toxic Loam consistently, dealing moderate damage to all players as long the Phase 2 continuous.
Corrupted Soil
Coming to close to Gnarlroot himself during Phase 2 deals damage to players with Corrupted Soil.
Uprooted Agony
As soon as all Doom Roots are destroyed, Phase 2 ends and Gnarlroot gets affected by Uprooted Agony.
This causes the Boss to take 100% more damage for 20 seconds.
Gnarlroot grants himself Rising Mania afterwards, granting him 10% increased damage for the remaining fight.
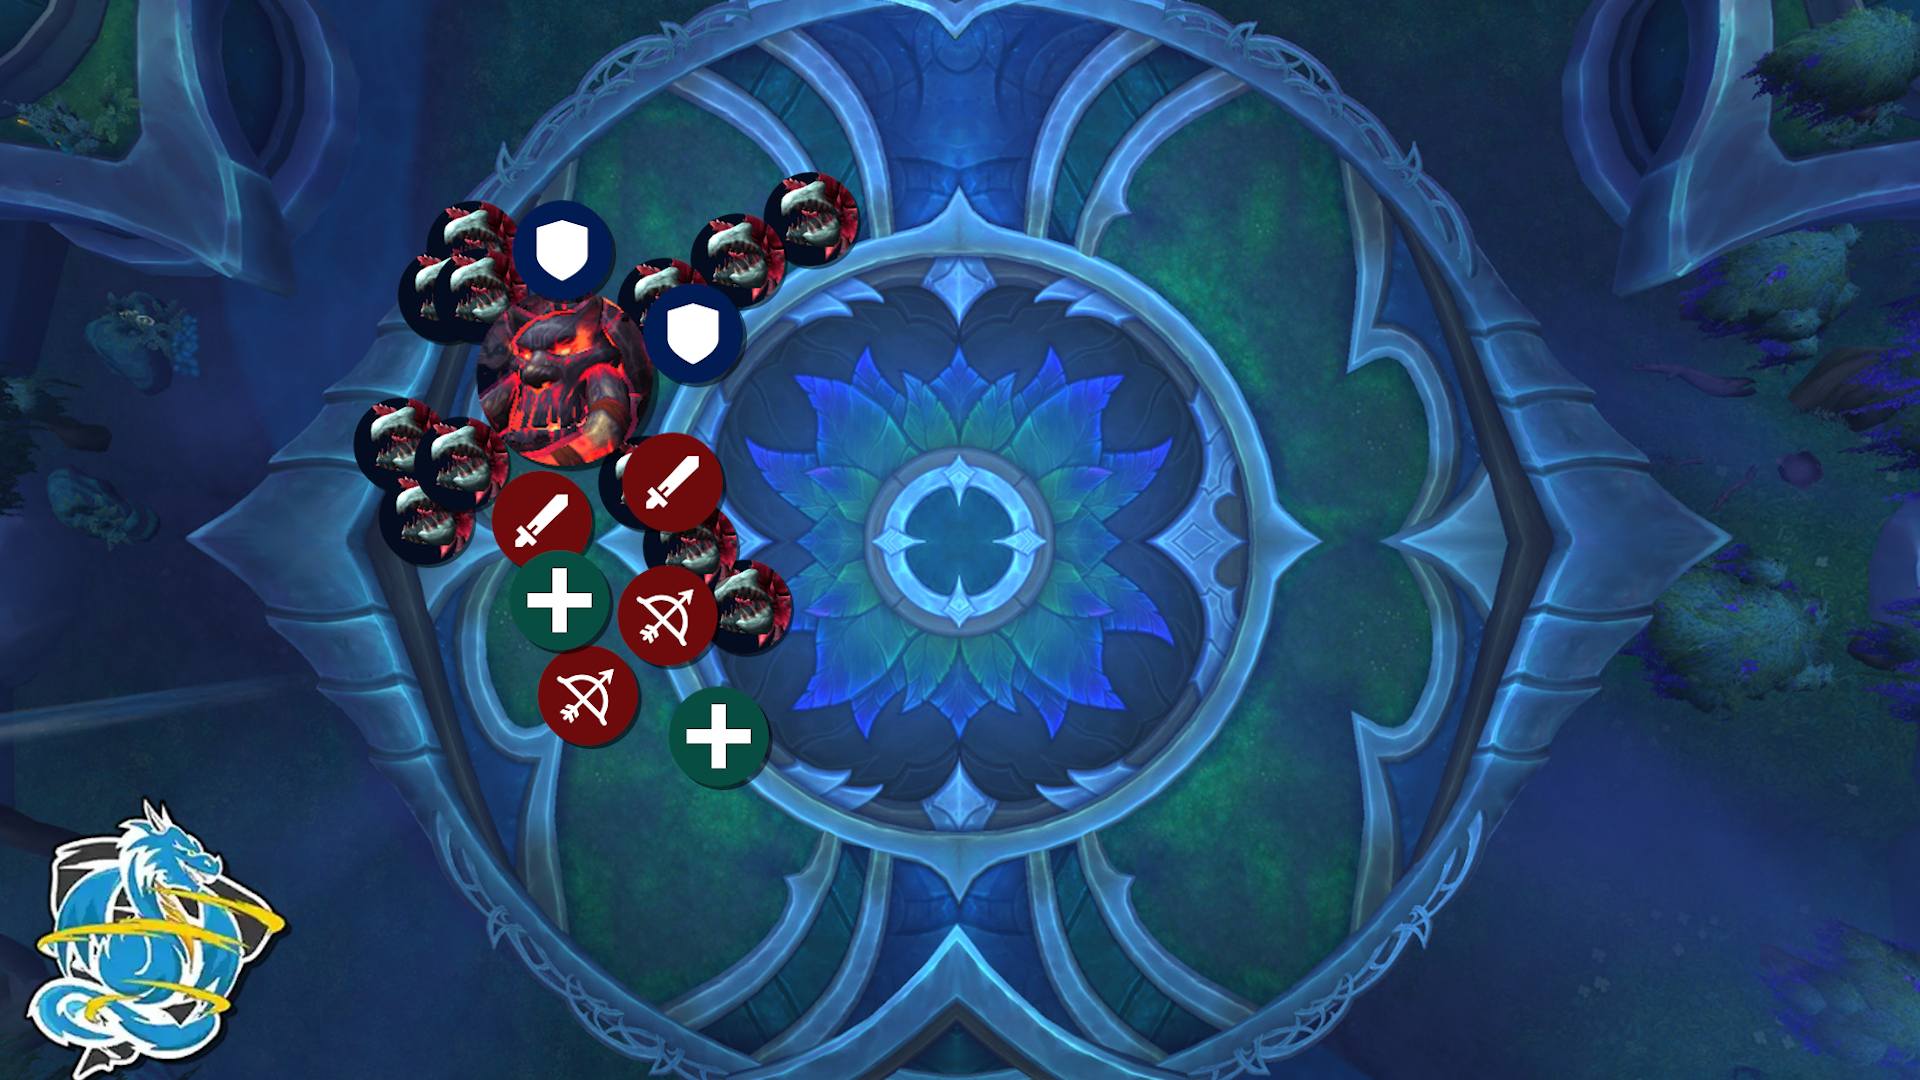
Move Boss to the outside, so Lashers spawn more stacked.
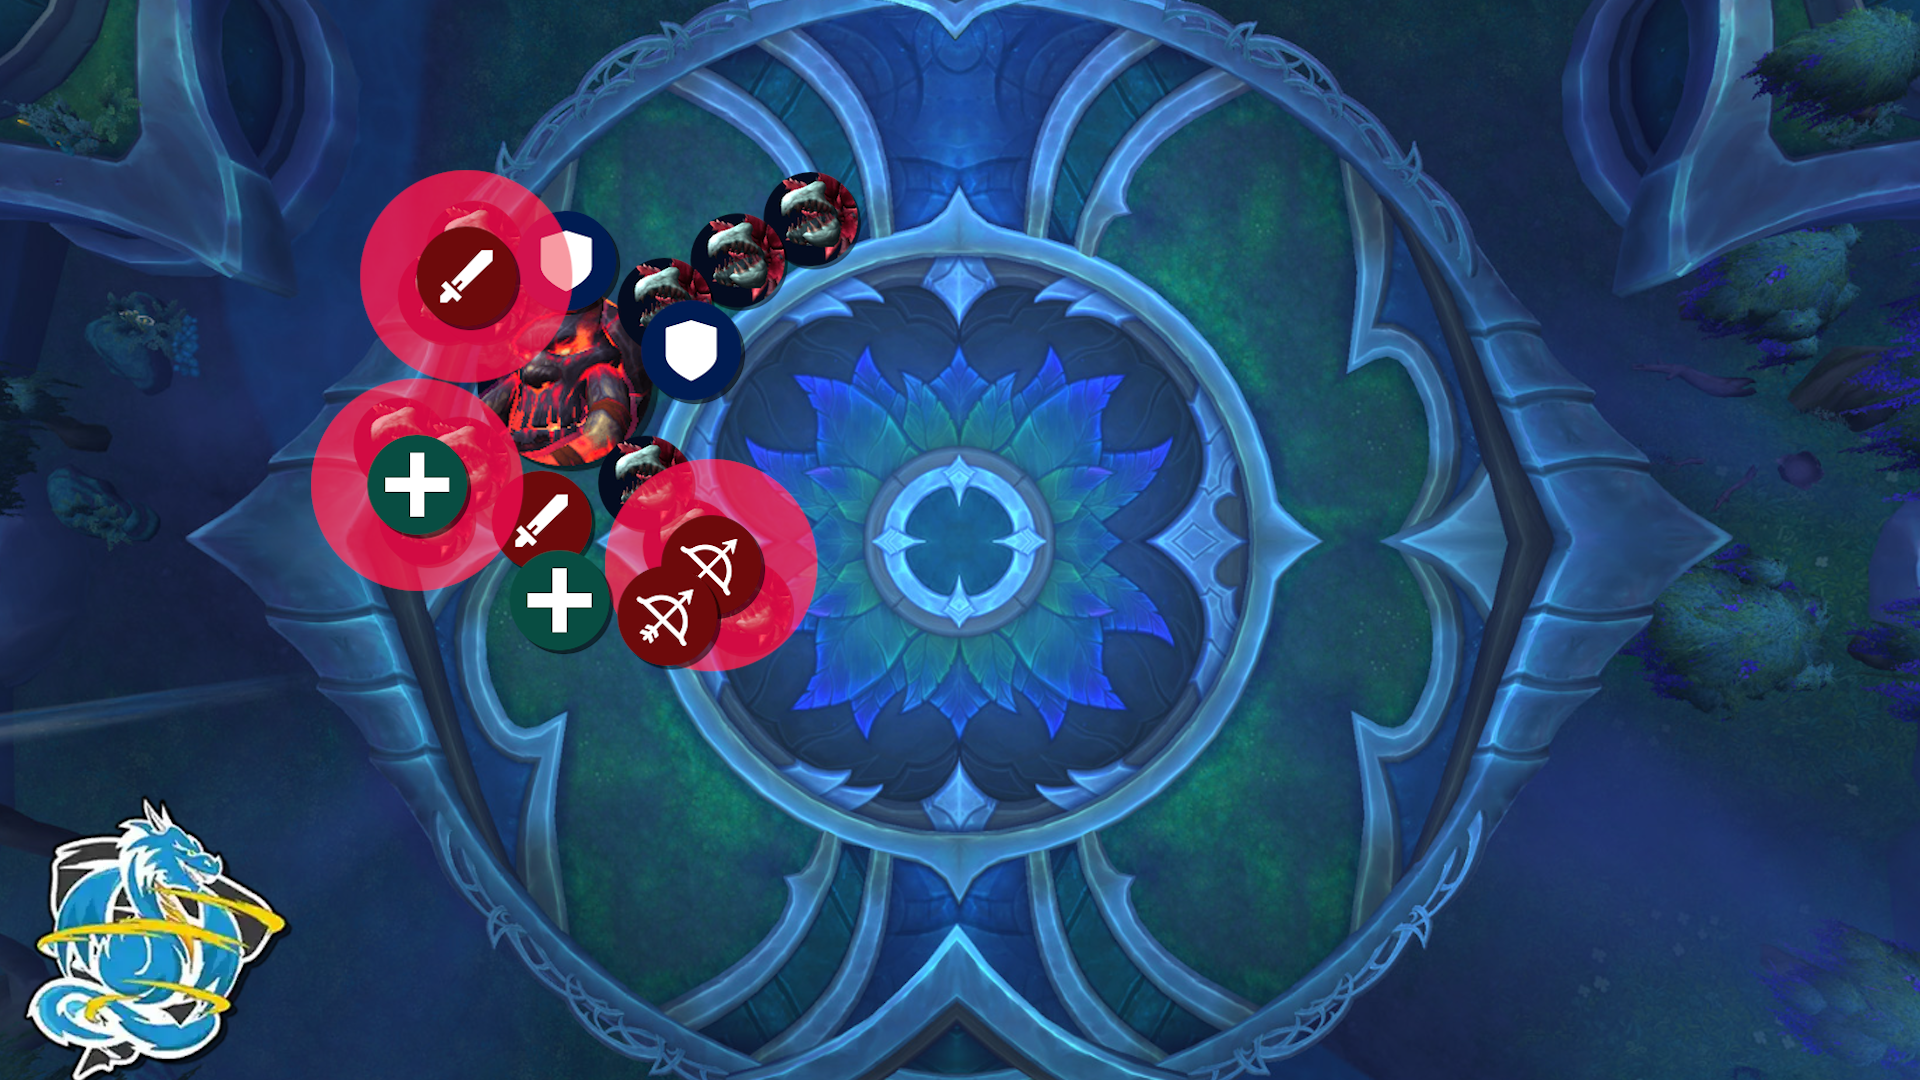
Activate Lashers in Heroic by putting Voidzones on them.
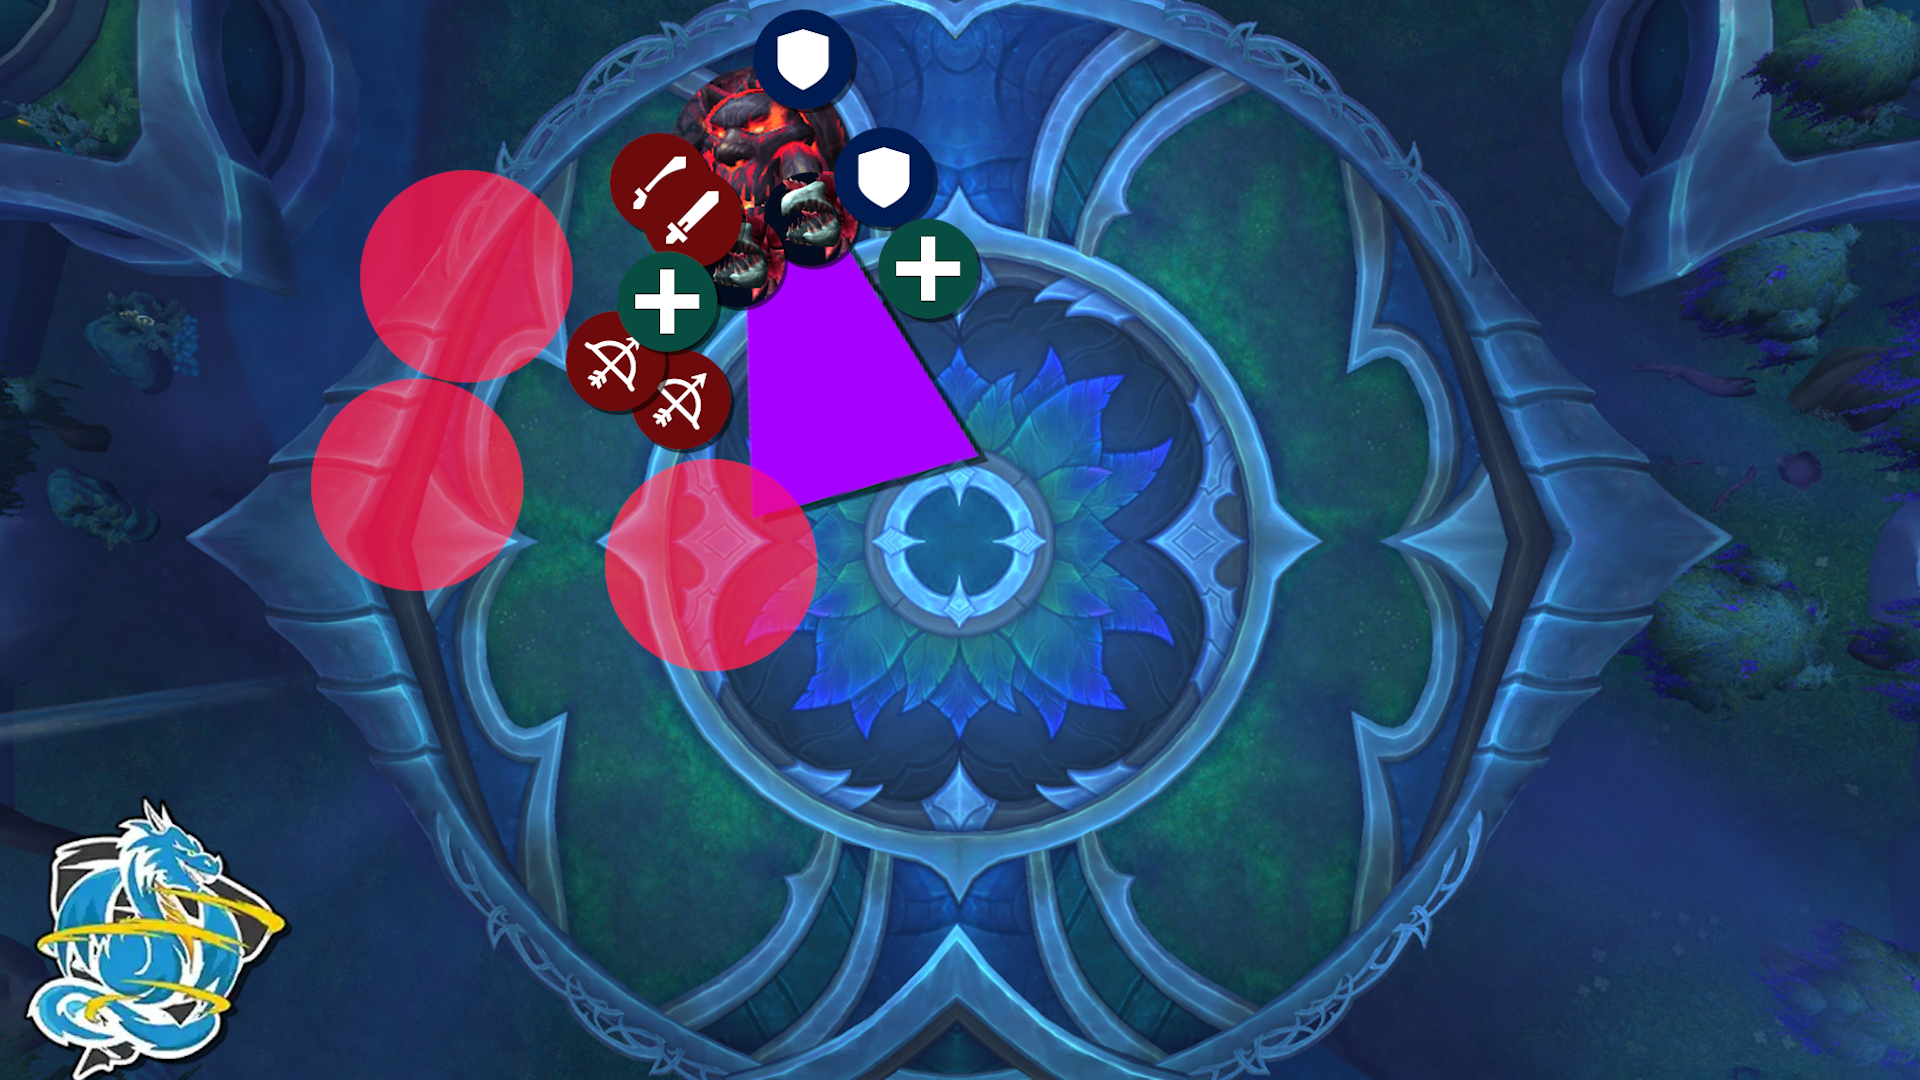
Keep moving the Boss around for space, dodge the frontal cone.
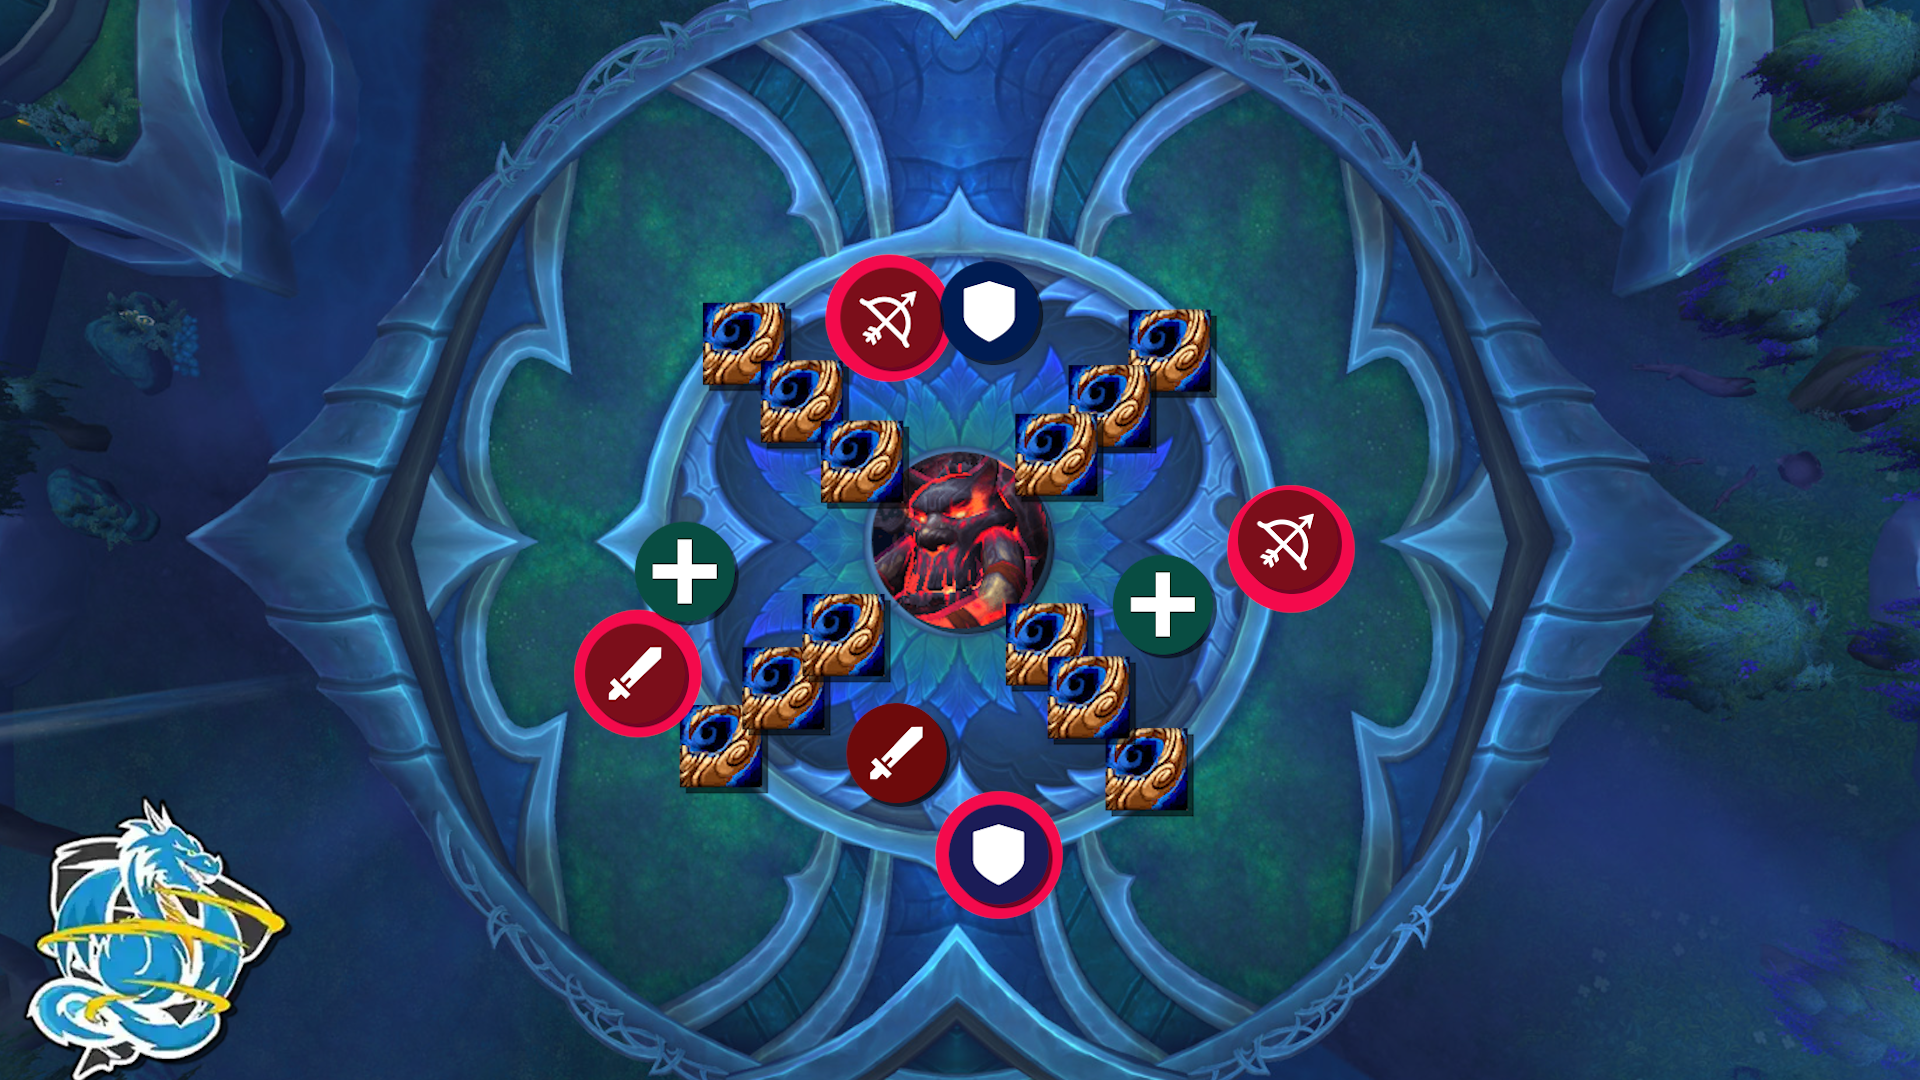
Split group and soak Voidzones, then touch roots with debuff.
Second Boss: Igira the Cruel
Notable Abilities
- Side-step the Twisting Blades that are spawned in the direction of a random player.
- Spread out, and kill all Blistering Spears which root a few player.
- One of three Torments must be soaked per Intermission, which grants Igira a new ability.
Changes in Heroic Mode
Shared Agony & Drenched Blades
Igira strikes another close-by target of his current target for additional damage.
Tanks must stay close to each other all the time.
Each automatic attack by Igira triggers Drenched Blades, a stacking bleeding debuff on the current Tank.
 Blistering Spear
A few players will be marked with Blistering Spear. Upon expiration, they explode, dealing damage to other players in a 10-yard radius around them, leaving a large Voidzone, and then rooting the players that were targeted by this debuff.
These Spears have to be defeated to free the players.
 Twisting Blade
Igira spawns three Twisting Blades which travel in the direction of a random player.
This is a simple side-step mechanic that has to be dodged.
 Marked for Torment
Upon reaching 100 Energy, Igira starts Marked for Torment. This activates three different prisoners located left, right and in the entrance of the room.
Soaking on of these Torments will grant Igira one new ability until the next time he reaches 100 Energy. Players soaking them triggers Gathering Torment, dealing damage to players inside of it. In Heroic, after soaking a Torment, they will gain Flesh Mortification, increasing damage taken by soaking more Torments by 100%.
During this time while channeling Marked for Torment, he will spawn Searing Sparks. These are Voidzones below random players that have to be dodged.
If no Torment is soaked, he uses Ruinous End that wipes the Raid.
 Heart Stopper
Soaking the Torment on the right side will grant Igira the Heart Stopper ability. This is a healing absorption debuff on all players that explode for lethal damage if not healed off.
In Heroic, this also triggers Vital Rupture, causing Orbs to eject from players as soon as the Debuff is removed.(Update: Mythic only now)
 Smashing Viscera
Soaking the Torment at the entrance will grant Igira the Smashing Viscera ability. This causes the Boss to leap towards a player, dealing damage in a 15-yard radius on impact before leaping to another player.
In Heroic, this also triggers Devastation, spawning additional swirlies that have to be dodged by players.
 Wracking Skewer
Soaking the Torment on the left will grant Igira the Wracking Skewer ability. This will cause Igira to cast a Group-Soak onto the Tank that deals lethal damage, split by all players.
This will also stun all players that soaked it for 10 seconds.
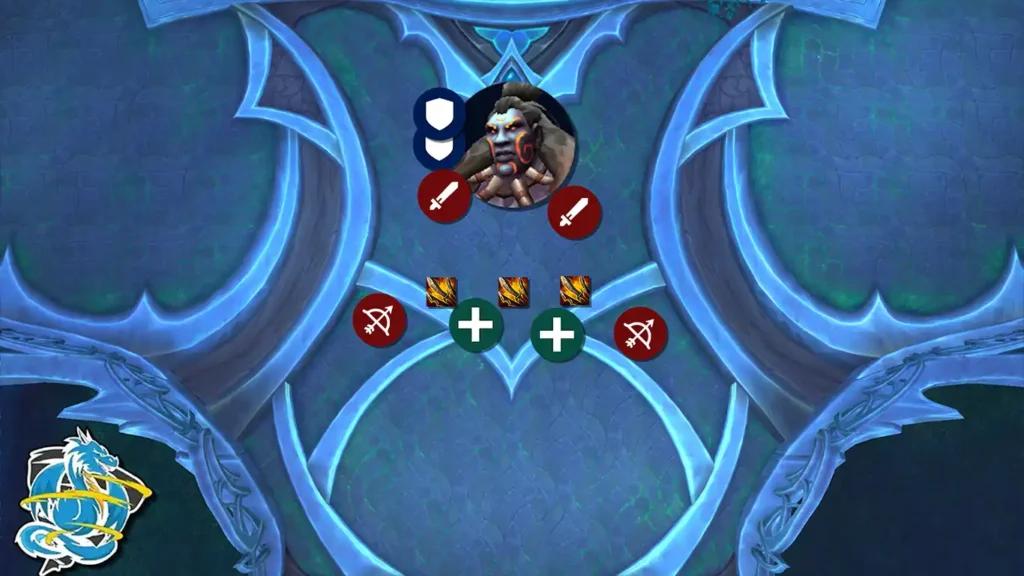
Slightly spread around the Room, Tanks stack up, Dodge Twisting Blades.
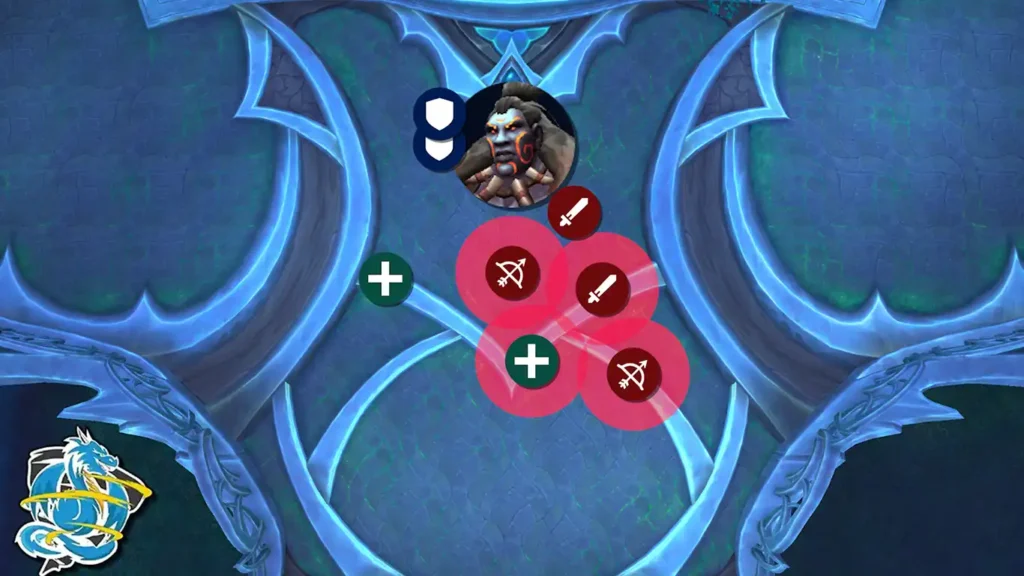
Stack as close as possible when affected by Blistering Spear.
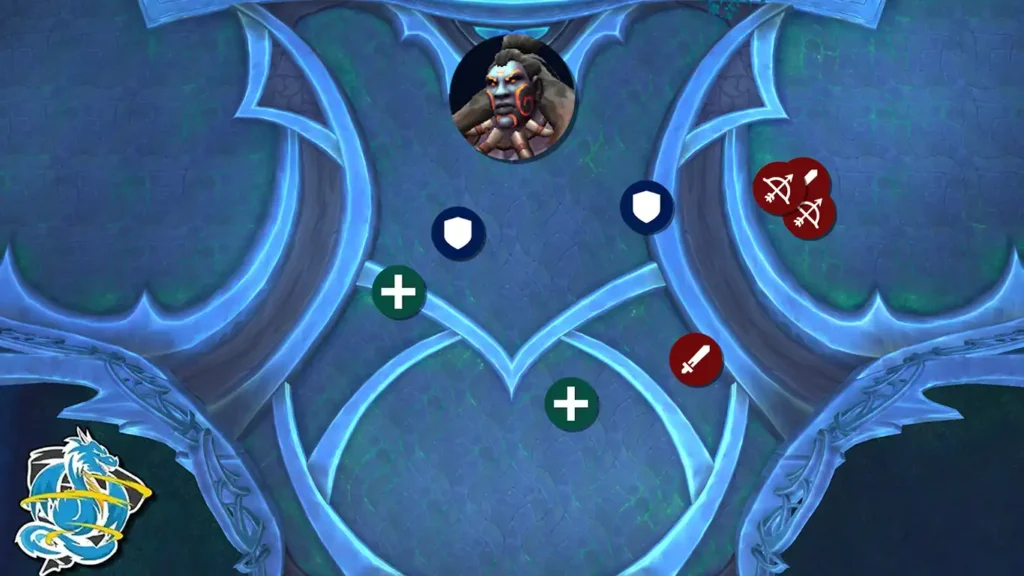
Soak Torments. In Heroic, split Group in three smaller Groups for each Intermission.
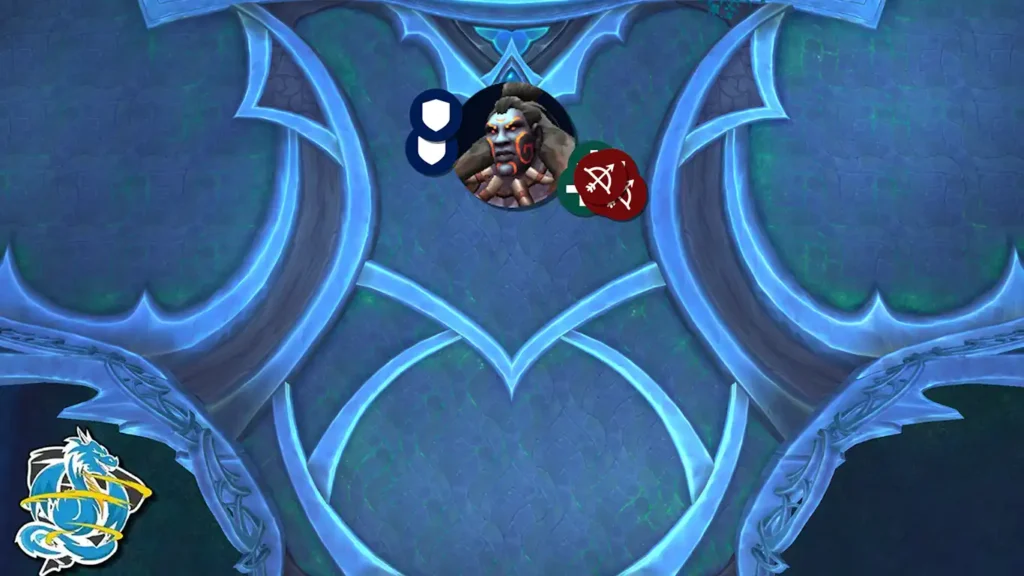
After soaking the right Torment, stack up. Let healers remove debuff.
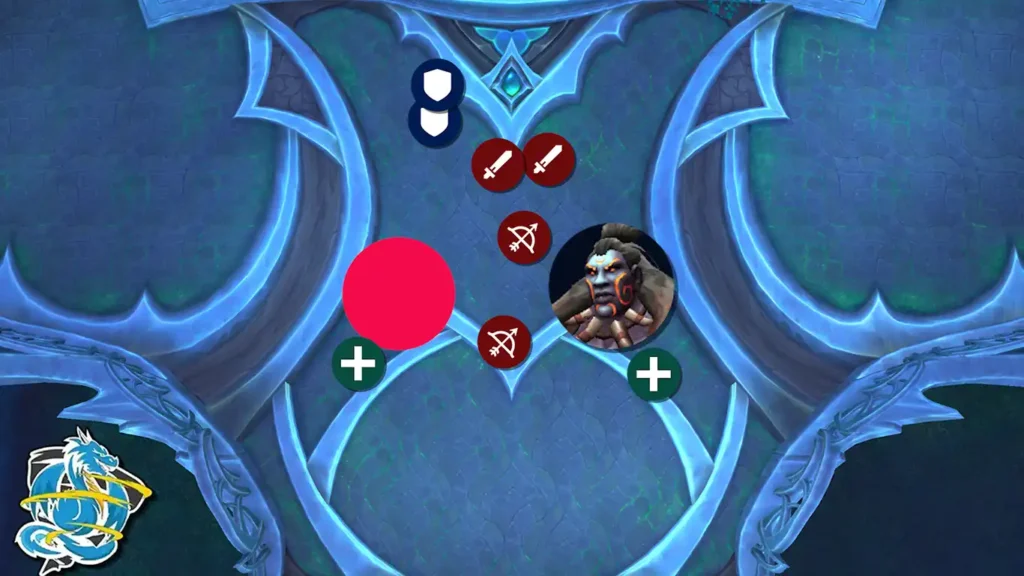
Soaking middle Torment triggers Leaps that need to be dodged.
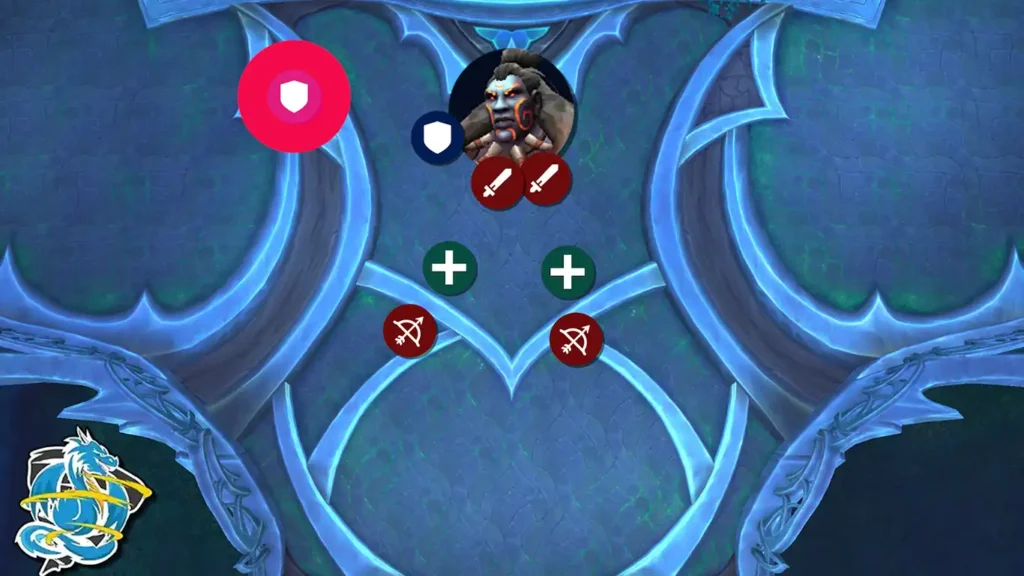
Soaking left Torment triggers Group Soak. Do this one last, either kill Boss before, or let Tank die.
Third Boss: Volcoross
Notable Abilities
- Split your Raid in two equal Groups, and continue moving left or right to soak F.
- Tanks should switch Aggro during Calamitous Jaws.
Changes in Heroic Mode
- Scorchtail Crash will also spawn Tidal Blaze, Waves that travel around the area that deal heavy damage to players struck.
Combusting Rage & Serpent’s Wrath
These abilities will be ending the encounter of this Boss, resulting in a wipe for your group. Combusting Rage deals deadly damage if no players are in melee range. Serpent’s Wrath is cast whenever the whole area is full of Hellboil fire voidzones.
Serpents Fury & Burning Vertebrae
Those two abilities are in the responsibility of the healers in your group. While Burning Vertebrae deals small periodic damage over the duration of the encounter, Serpents Fury is a 5 seconds channel of Volcoross that deals heavy damage every 0.5 seconds.
Molten Venom & Cataclysm Jaws
These abilities are the responsibility of the Tanks. Molten Venom is a stacking debuff on the current active Tank that deals damage over time and increases the damage taken of Cataclysm Jaws by 50% per stack. Cataclysm Jaws is a large hit onto the current Tank that deals nearly lethal damage. The current Off-Tank has to taunt just before this ability hits the current Tank.
 Coiling Flames
Frequently, a few players will be affected by Coiling Flames. This creates a circle around the targeted players and deals damage over time to them and all players in a 10-yard radius.
 Volcanic Disgorge
Volcoross spews Volcanic Disgorge, little swirlies which deal damage to players struck, and leave Hellboil on impact.
 Scorchtail Crash
Volcoross’ tails spawn and crash into the Boss area. This is indicated by a large shadow. This deals nearly lethal damage to players struck and knocks them away.
In Heroic, this also spawns Tidal Blaze waves that travel away from the location of impact, in a circle around the area of this encounter.
 Flood of the Firelands
Upon 100 Energy, Volcoross uses Flood of the Firelands, spawning two large voidzones that have to be soaked. They will leave Hellboil on the floor, depending on how many players have soaked it.
Split your raid group in two groups and travel in opposite ways around the area. This will seperate both groups for the rest of this encounter.
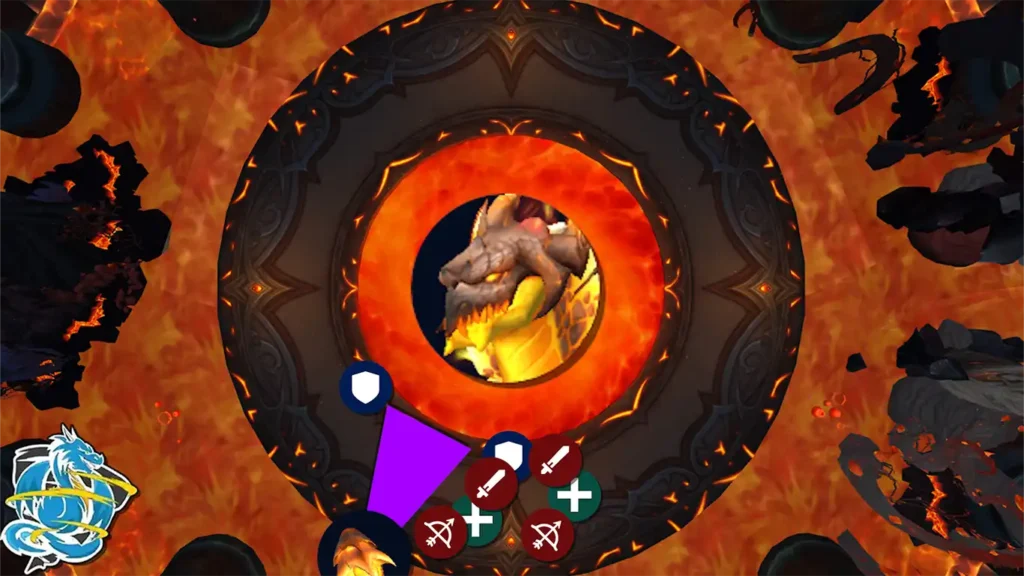
Dodge the Scorchtail Crash.
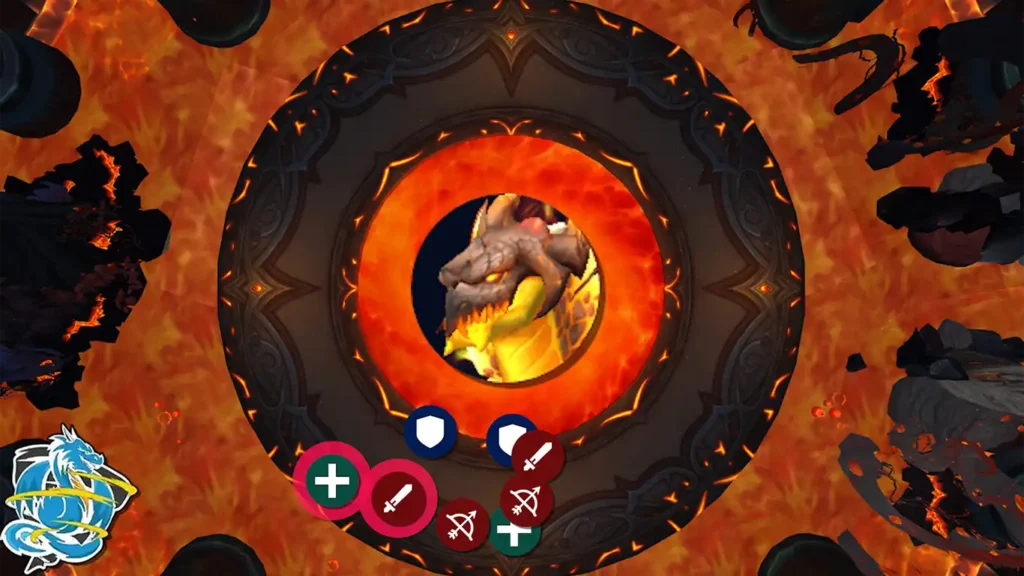
Spread out when affected by Coiling Flames.
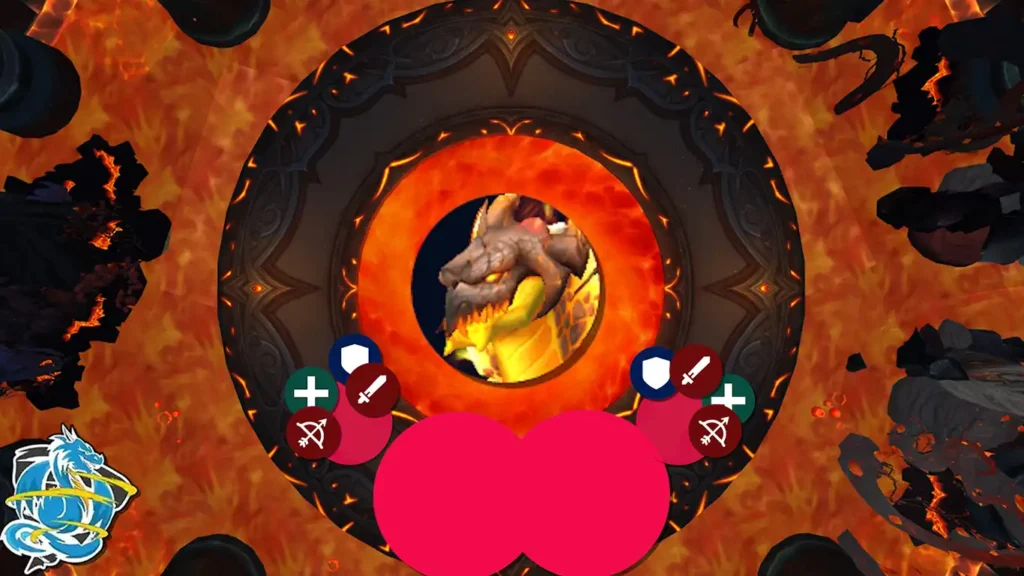
Split your Raidgroup in two groups, then keep soaking Flood of the Firelands on each side at 100 Energy.
Fourth Boss: Council of Dreams
Notable Abilities
- When Urctos reaches 100 Energy, stun him with a Polymorph Bomb.
- When Pip reaches 100 Energy, stand in the Noxious Blossom to remove your Debuff.
- When Aerwynn reaches 100 Energy, stun her with the Barreling Charge from Urctos.
Changes in Heroic Mode
- Soaking the Barreling Charge will apply a Vulnerability to soaking the charge again.
- Agonizing Claws is now a frontal cone.
- Polymorph Bomb now spreads to other players upon removal.
Urctos
 Blind Rage
Upon reaching 100 Energy, Urctos uses Blind Rage, dealing damage over time that increases in intensity.
This cast must be interrupted by a Polymorph Bomb that is removed within Urctos’ range.
If not interrupted, Ursine Rage will wipe the raid.
 Barreling Charge
Frequently, Urctos uses Barreling Charge in the direction of the Tank.
After the charge, he deals raid-wide damage with Thundering Impact. This damage is reduced by the amount of players that were struck in the Barreling Charge.
In Heroic, soaking the Barreling Charge applies a vulnerability, increasing damage taken of the next Barreling Charge.
 Agonizing Claws
Urctos uses Agonizing Claws onto the Tanks which increases their damage taken by this ability for 20 seconds.
In Heroic, this is now casted as a frontal cone.
Aerwynn
 Constricting Thicket
Upon reaching 100 Energy, Aerwynn uses Constricting Thicket that slows players and deals damage over time.
This has to be interrupted by Urctos’ Barreling Charge which Tanks need to aim towards her in this moment.
If not interrupted, Relentless Barrage will result in a wipe.
 Noxious Blossom
Aerwynn spawns many Noxious Blossom on random locations. Standing in these deals damage with Corrosive Pollen, but they also deal raid-wide damage as long as they persist, one stack per active Noxious Blossom.
Poisonous Javelin
Aerwynn will throw Poisonous Javelin on random players, dealing damage and applying a poison debuff that needs to be dispelled.
Pip
 Song of the Dragon
Upon reaching 100 Energy, Pip uses Song of the Dragon which applies a debuff to all players.
This debuff can only be removed by moving into a Noxious Blossom long enough.
If not removed, Captivating Finale will kill all players still maintaining this debuff.
 Polymorph Bomb
A few players will be affected by Polymorph Bomb. This transforms then into a Duck for 12 seconds.
Walking over 3 Noxious Blossom allows the player to remove that debuff manually.
This debuff has to expire or be removed ontop of Urctos during his Blind Rage.
In Heroic, this spreads to other players within 7-yards upon removal.
Emerald Winds
Pip casts Emerald Winds which deals moderate damage to all players over 2 seconds and pushes them away.
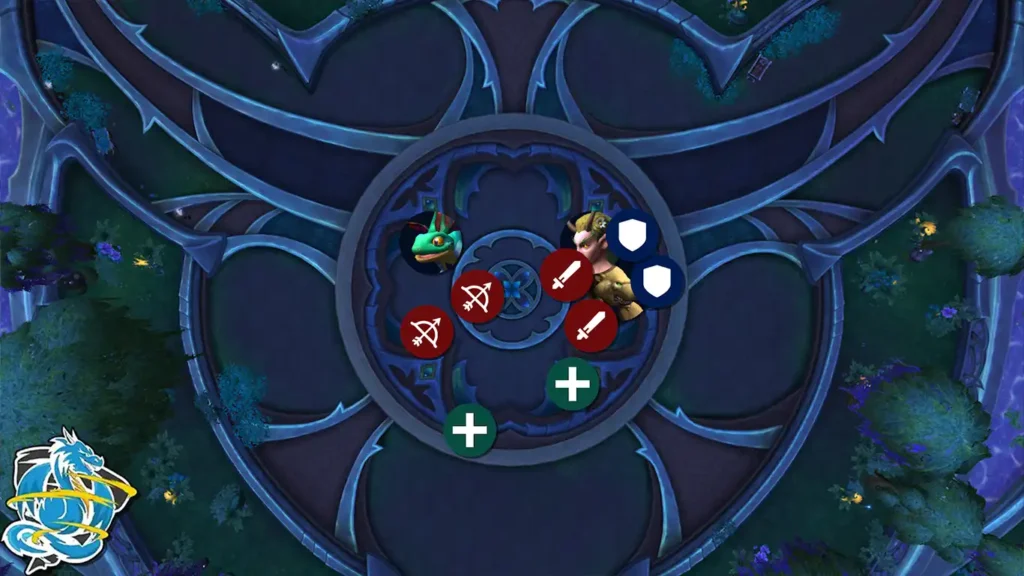
Tank Urctos always close to Aerwynn, let ranges focus on Pip.
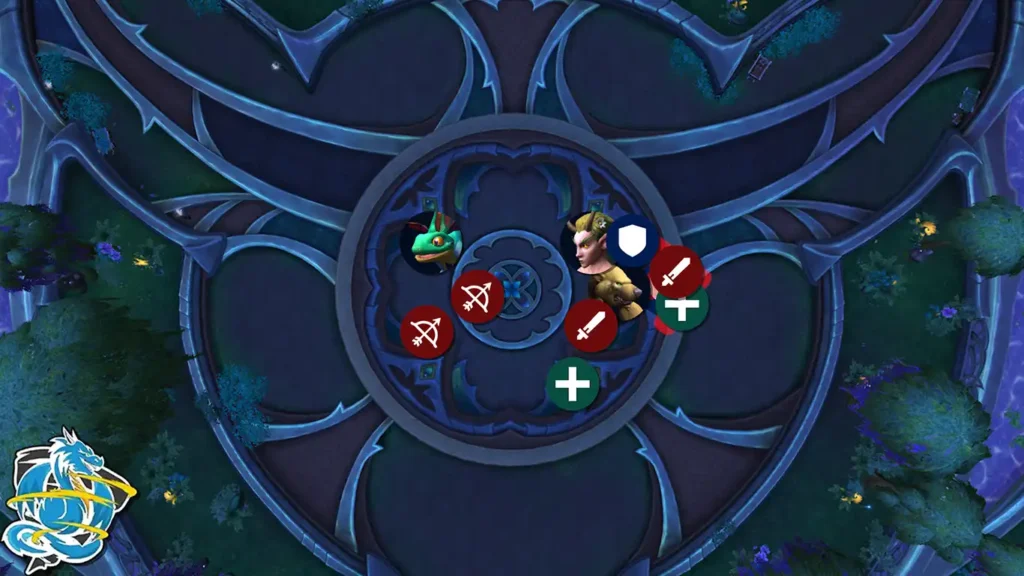
Help soaking the Charge. In Heroic, rotate two groups to soak the Charge.
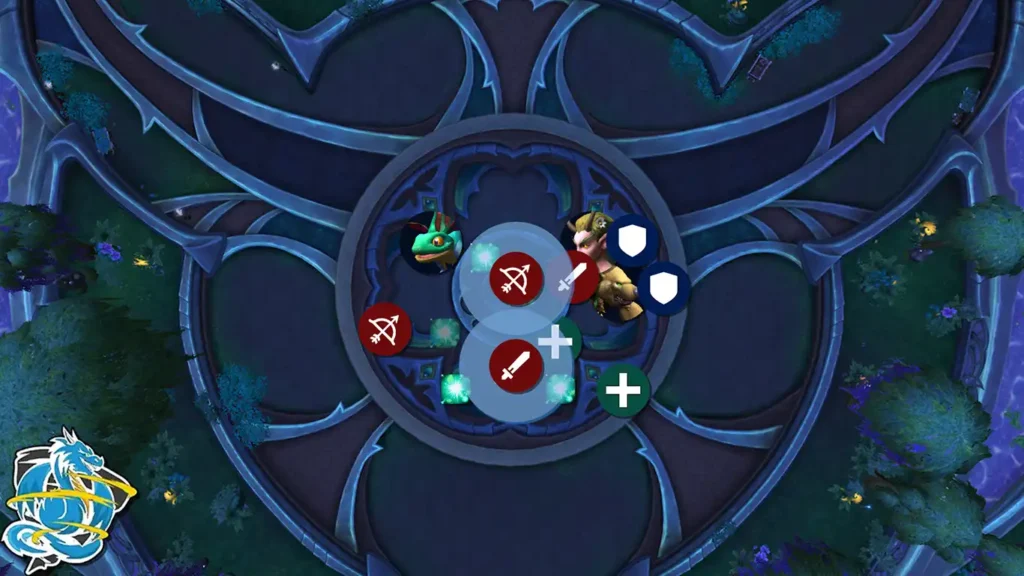
Whenever polymorph, run over Noxious Blossoms, but leave some alive.
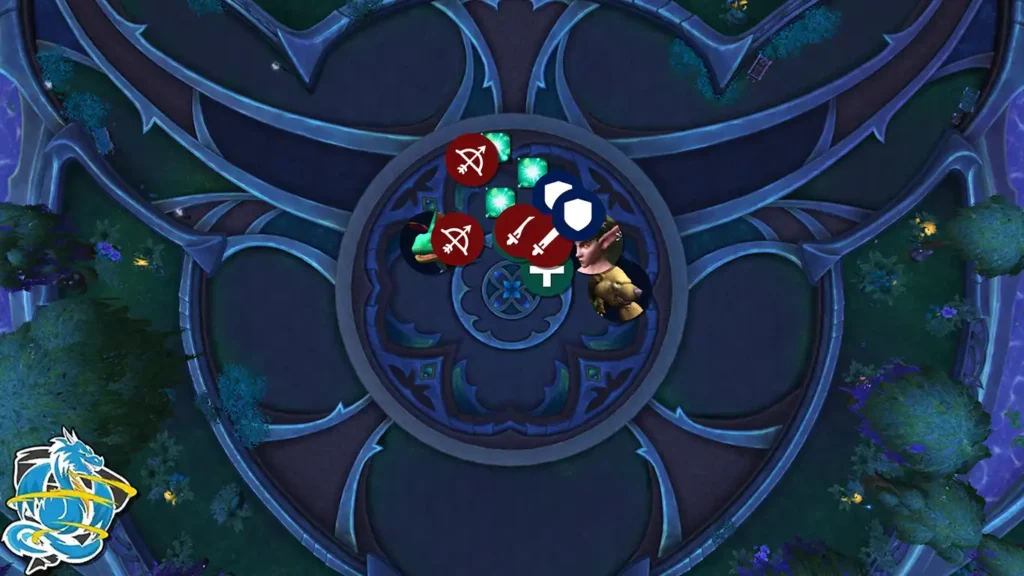
When Pip reaches 100 Energy, cleanse your Debuff in Noxious Blossoms.
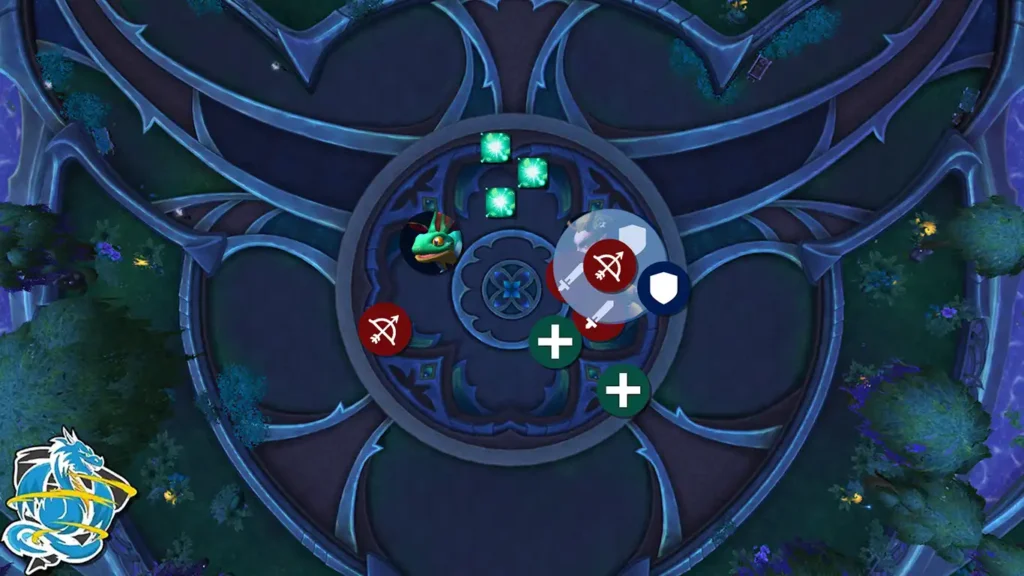
When Urctos reaches 100 Energy, stun him with a Polymorph Bomb.
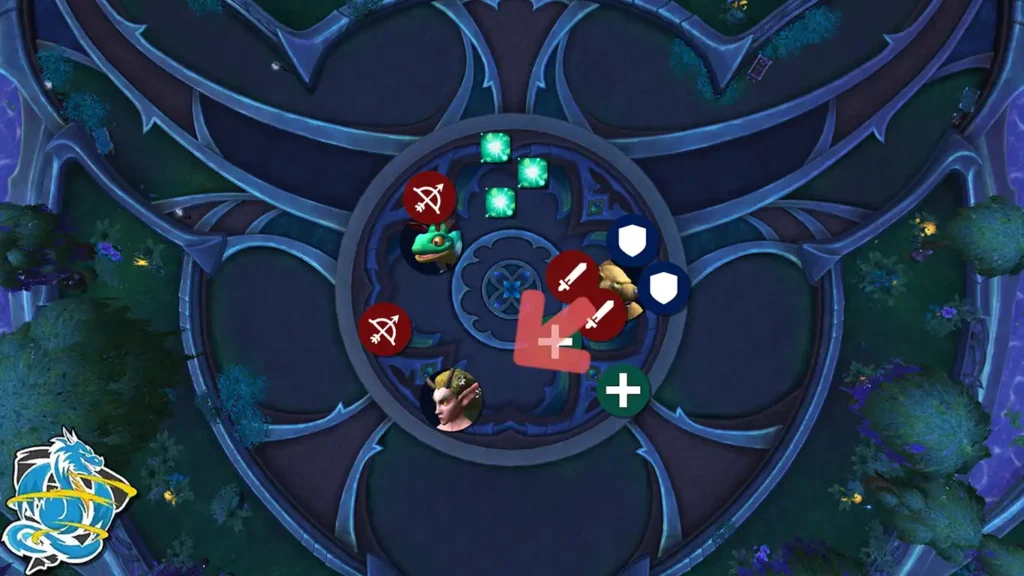
When Aerwynn reaches 100 Energy, aim the Charge into her.
Fifth Boss: Larodar, Keeper of the Flame
Notable Abilities
- Hide in the Nature’s Bulwark during Raging Inferno.
- Drouse Fire with Dreams Blossom.
- Soak Falling Embers in Phase 2.
Changes in Heroic Mode
- Players are prohibited to form another Bond with Dream Blossom for 2 minutes after using it.
- Furious Charge deals now damage to all players, reduced by distance to its target.
Phase 1
 Seed of Life
The Seed of Life is located in the middle of the room. Players can interact with it as soon as it gained some energy, indicated by the bar above it. Interacting with it causes players to spray Dream Blossom, cleanse all Burning Ground they are coming into contact with.
In Heroic, Dream Fatigue prohibits the same player to interact with the Seed of Life again for 2 minutes.
 Fiery Force of Nature
Larodar spawns Fiery Treant which start attacking players. They use Blistering Splinters that causes their melee attacks to deal additional damage and a stacking debuff. Fiery Flourish is an interruptable cast that deals damage to players within 12-yards. Upon death, they use Explosive Bark and turn themself into a Charred Treant.
Charred Treant need to be healed to full health by your Healers. Upon reaching full health, they transform into Renewed Treant.
These Renewed Treant run towards the Seed of Life and cast Natures Gift to grant it energy. These Renewed Treant will lose health over time, and are susceptible to buffs or other damage sources.
 Scorching Roots
Scorching Roots is another add that is spawned throughout this encounter. This add fixates a random player and uses Scorching Bramblethorn to player its coming into contact with to root them. Upon death, they turn into Charred Brambles. In Heroic, the Scorching Roots is not targetable until they are droused by Dream Blossom from the Seed of Life.
After healing the Charred Brambles to full health, they turn into a Renewed Bramble Barrier, creating a Natures Bulwark that reduces players damage taken from Raging Inferno by 90% while inside of it.
Furious Charge
Larodar uses Furious Charge on his current target, and then charges to them after a few seconds. Standing in his path deals heavy damage and knocks players away. This then deals heavy damage to the Tank, reduced by the distance from Larodar’s initial position. The Tank will be then affected by Natures Fury, causing him to take 1000% more physical damage for 20 seconds.
In Heroic, the impact damage from Furious Charge is also causing Furious Outburst, dealing damage to all players, reduced by the distance to Larodar.
 Blazing Thorns
The Boss uses Blazing Thorns frequently, creating several swirlies around him in a spiral. This deals damage to players inside and knock them away. This then spawns Blazing Coalescence, little orbs that need to be collected by players, otherwise they grant Larodar an increased damage buff for 20 seconds.
Raging Inferno
Upon reaching 100 energy, Larodar casts Raging Inferno, dealing deadly damage to players over 6 seconds. Players can survive this damage by standing in the Renewed Bramble Barrier.
He afterwards gains a stack of Combusting Presence, causing him and other adds to spawn even more Burning Ground.
Intermission
Upon reaching 40% Health, Larodar channels Consuming Flames for 16 seconds.. This deals damage to players and draws them into the Boss. Standing close to Larodar will cause players to take additional damage.
Phase 2
 Falling Embers
In Phase 2, Larodar spawns Falling Embers. These voidzones must be soaked otherwise they explode for raid-wide damage and apply an additional stack of Searing Ash to all players.
Searing Ash
Throughout this Phase, all players will gain Searing Ash. This debuff stacks, and deals damage every few seconds.
 Flash Fire
Some players will be frequently affected by Flash Fire. This creates a 8-yard circle around them, and then deals damage to all players in that range upon expiration after 8 seconds. Flash Fire also causes the players to receive a healing absorption that must be healed off before the debuff expires, otherwise players will be stunned for 20 seconds by Encased in Ash.
 Fire Whirl
Larodar spawns Fire Whirl which travel in a circle around the area and deal damage to players that are inside of them.
Smoldering Backdraft
The Boss uses Smoldering Backdraft, a frontal cone in the direction of the current Tank.
Players struck will receive Smoldering Suffocation, reducing their healing taken by 100% for 16 seconds. During this time, the affected players can leech life from other party-members in a 6-yard radius around them.
 Ashen Call
Larodar uses Ashen Call, summoning many Ashen Treants that are traveling from the outside into the area. They explode upon death, and in Heroic leave Burning Ground in their path.
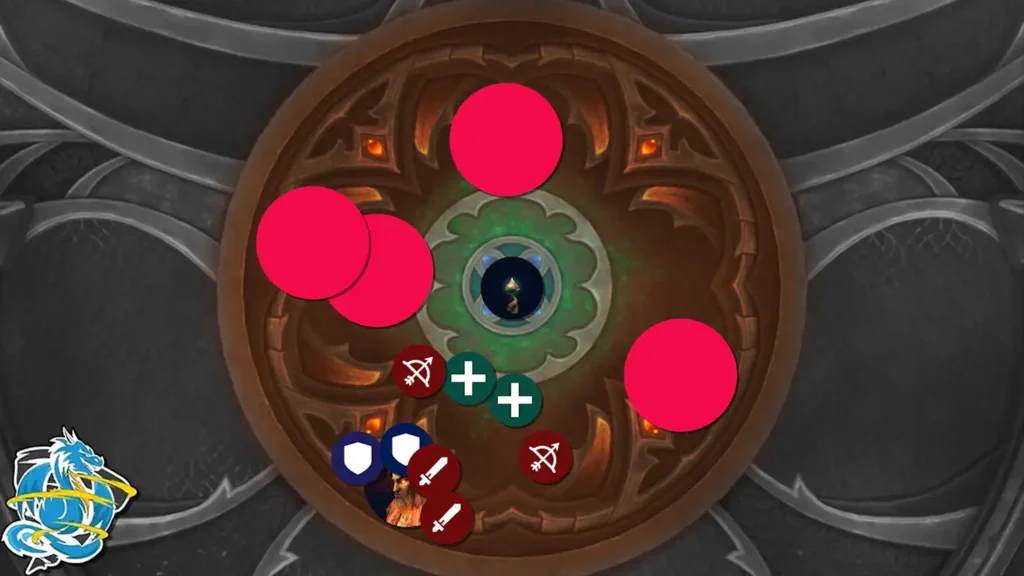
Move the Boss to the outside of the area that is available.
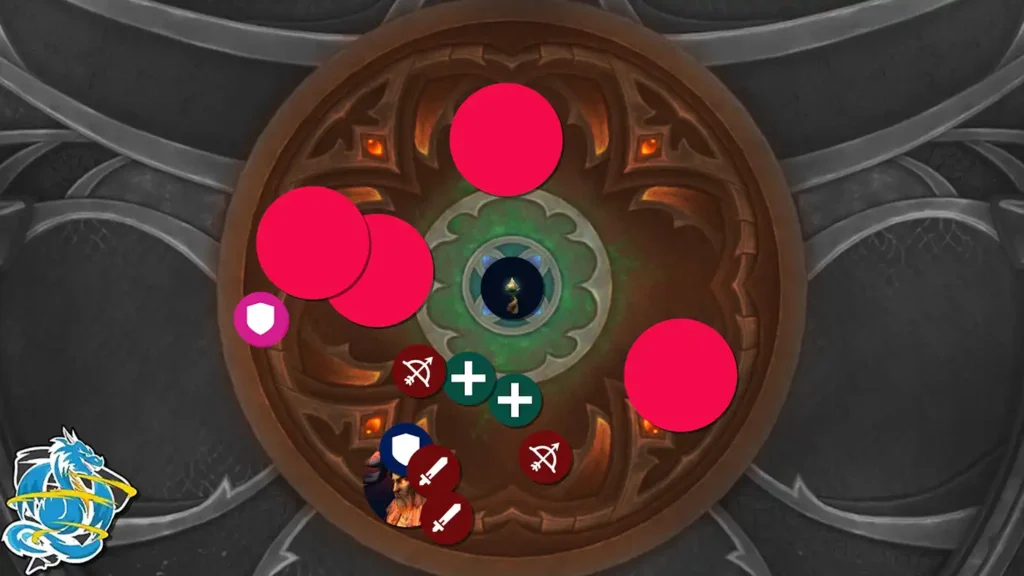
Tanks targeted by the Charge go far away.
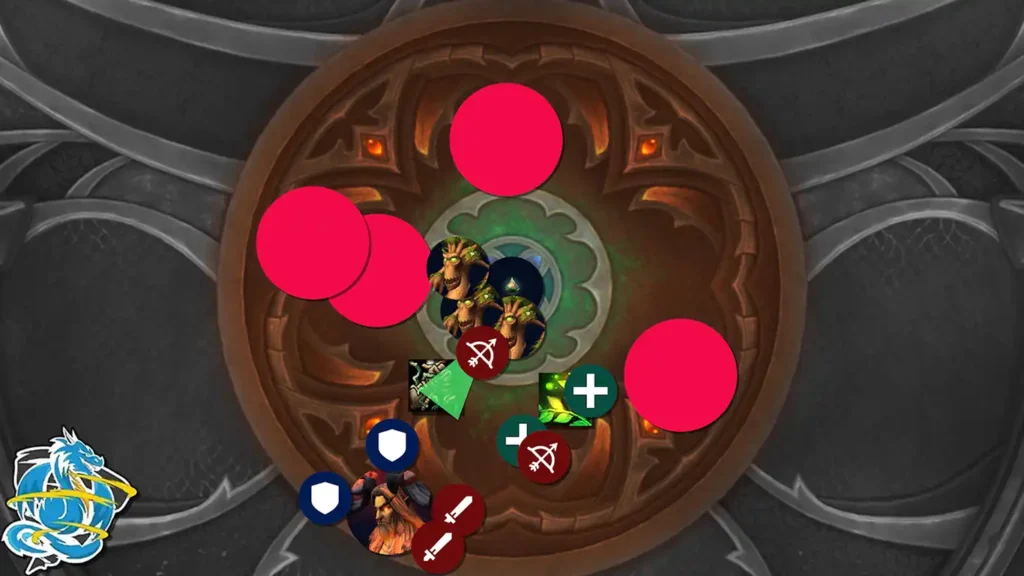
Kill Adds and Heal Adds. In Heroic, drouse the Roots before you attack it.
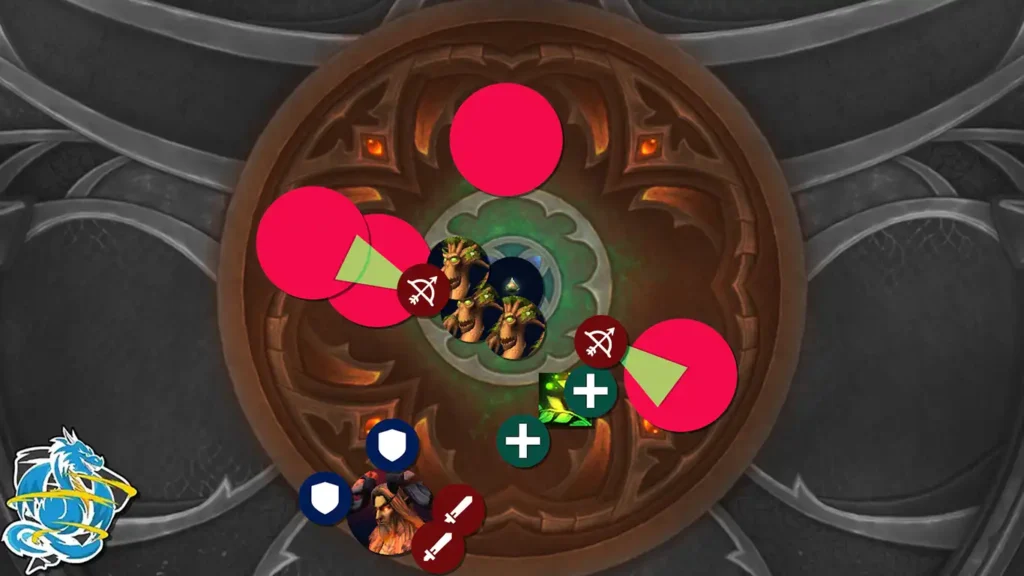
Help drousing fire in the room.
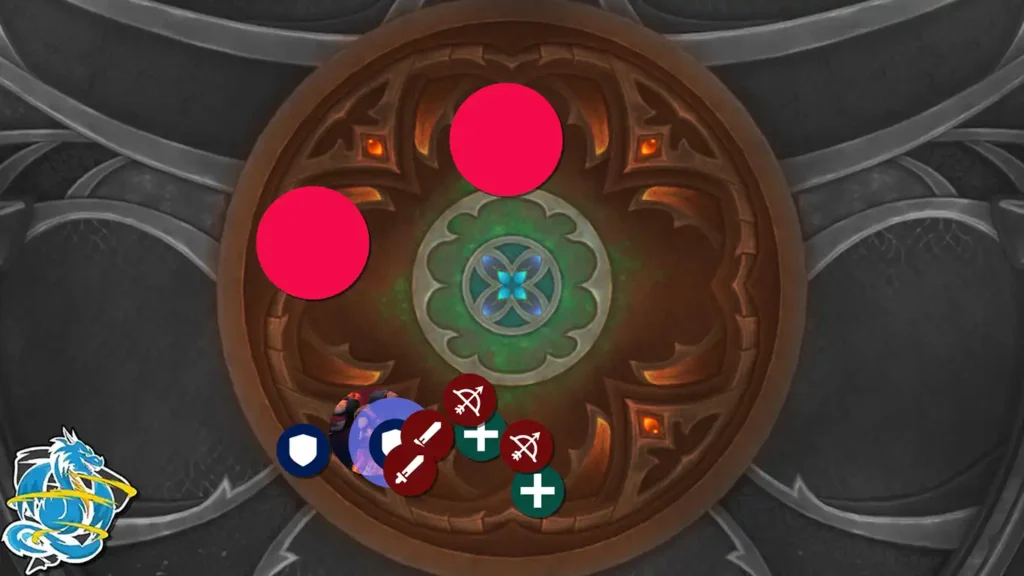
In Phase 2, face the Boss to the outside, and the Tank that got hit by the frontal stand close to other players.
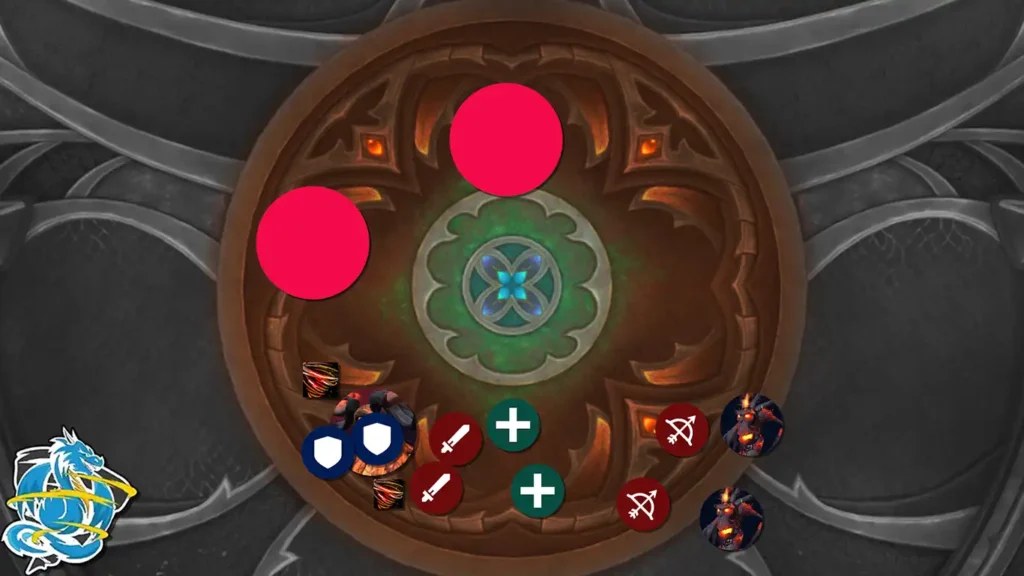
Dodge the Tornados and Range DPS kill the Adds.
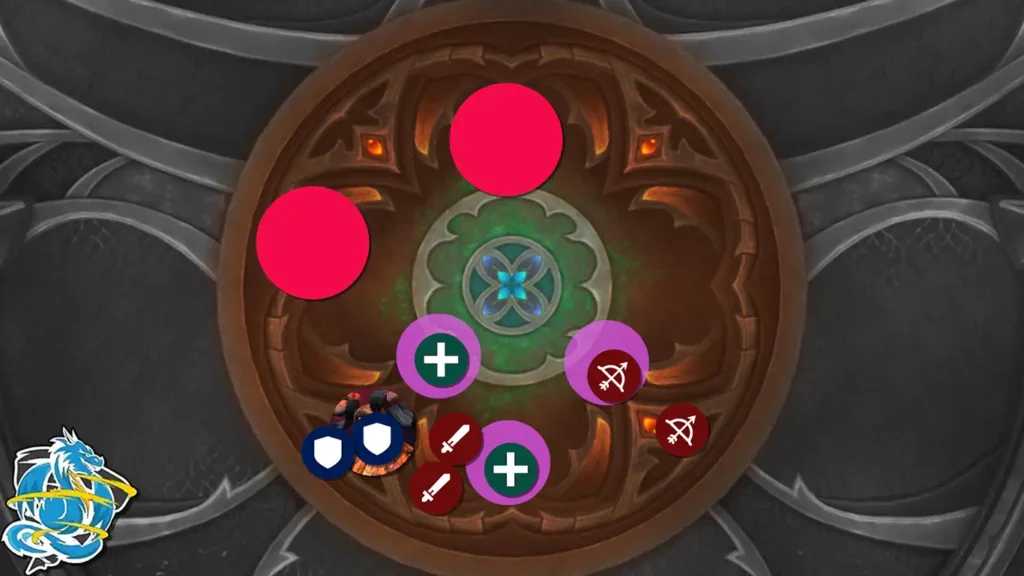
Make sure to soak the Falling Embers.
Sixth Boss: Nymue, Weaver of the Cycle
Notable Abilities
- The Area is seperated by Verdant Matrix which deals damage over time when players cross over them.
- Make sure to cross Verdant Matrix to reduce the damage of Threads of Life,
Changes in Heroic Mode
- Tanks will gain Woven Resonance after Weaver’s Burden, increasing their Nature damage taken per stack.
 Verdant Matrix
The Encounter Area is seperated by Verdant Matrix. This applies a damage over time debuff to players crossing over them which can stack.
Weaver’s Burden & Threaded Blast
Frequently, the current Tank will be affected by Weaver’s Burden. This lets the Tank explode after a few seconds, dealing raid-wide damage.
This damage reduces by the distance from the Tank to other players.
Nymue also attacks the Tank with Threaded Blast which deals heavy damage.
 Violent Flora
Violent Flora spawns along the Verdant Matrix, dealing damage upon explosion and leaving Inflorescence afterwards.
Inflorescence grants players increased movement speed while inside of it, and protects players from taking damage from Verdant Matrix.
 Threads of Life
Threads of Life is a projectile that fixates random players. This deals heavy damage and applies a damage over time debuff.
Crossing this projectile through Verdant Matrix reduces its impact damage.
In Heroic, the impact damage of Threads of Life deals damage to all party members instead.
Continuum
Upon reaching 100 Energy, Nymue casts Continuum.
This re-aligns all Verdant Matrix to a new pattern, increases the intesity of Violent Flora and Viridian Rain for the rest of the encounter, and spawns two Adds.
The Adds during this Phase use Protectors Shroud that reduces Nymue’s damage taken during this Phase by 99%. They also use Nature Volley to attack a random player for moderate damage.
Viridian Rain
Viridian Rain deals consistent damage during this encounter to players which has to be outhealed. This damage increases after each Intermission Phase.
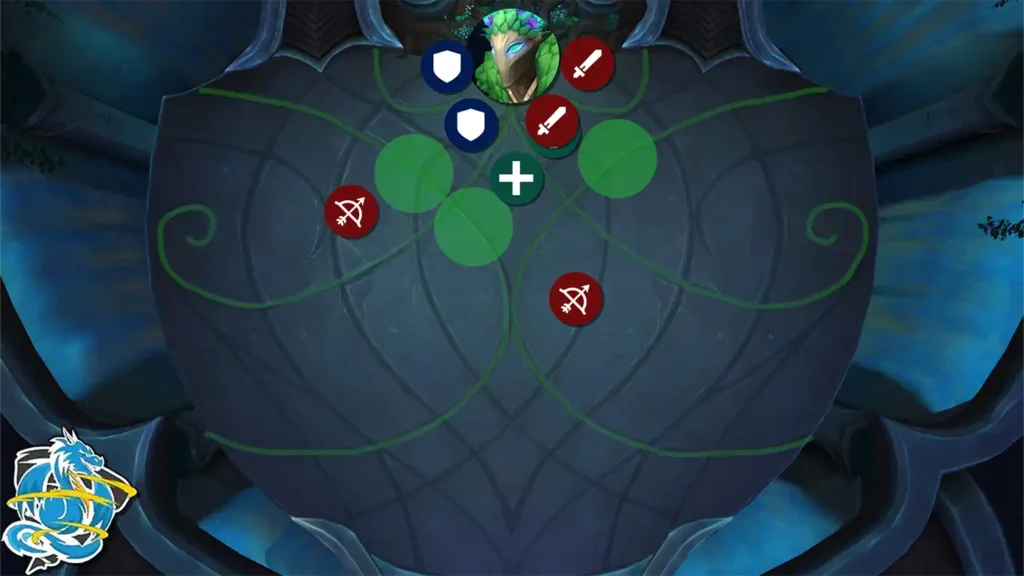
Dont stand in Verdant Matrix, dodge Violent Flora.
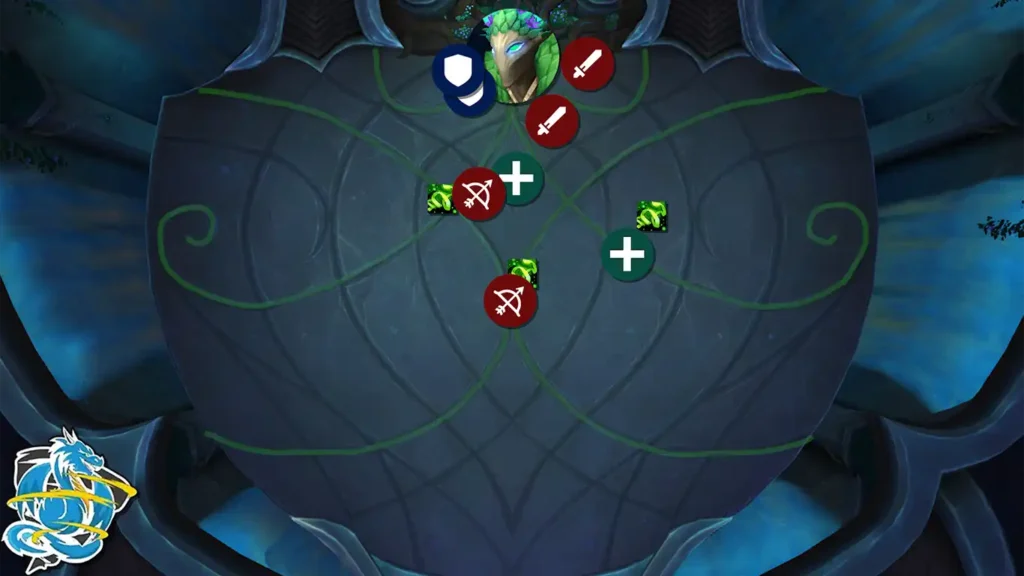
Move the Thread of Life through the Verdant Matrix.
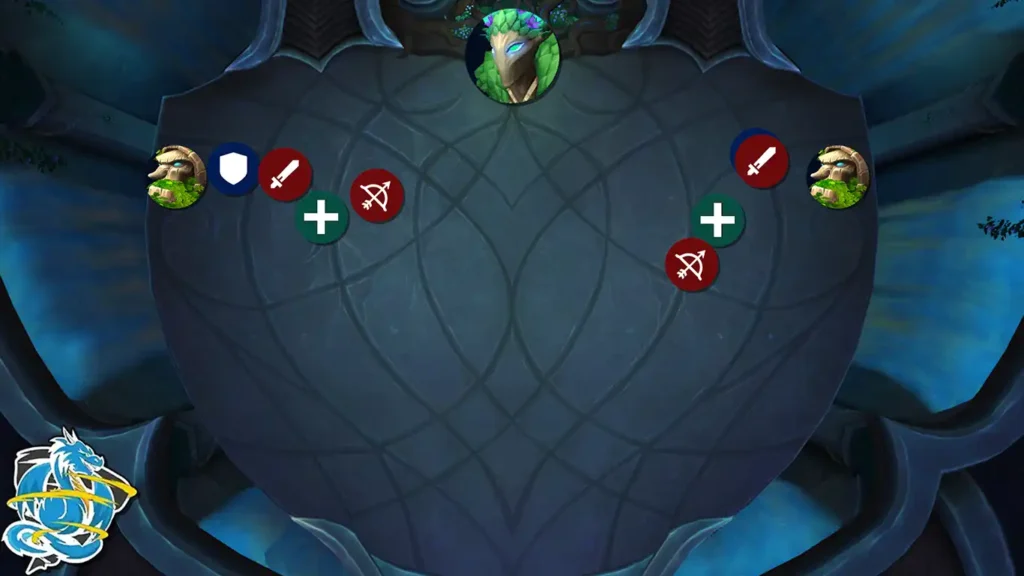
Split your group in two groups during Intermission and kill the Adds.
Seventh Boss: Smolderon
Notable Abilities
- Split your group in two, and make sure to help soaking the Brand of Damnation.
- Collect all Living Flames at the beginning of the Intermission.
Changes in Heroic Mode
- Brand of Damnation applies Searing Aftermath, an explosion upon the Tank.
- Overheated spawns Flame Waves around the target.
- Blazing Soul increases also the damage of Blistering Heat after each Intermission.
 Brand of Damnation
During Phase 1, Smolderon will use Brand of Damnation upon the current Tank. This deals heavy damage, split among all players struck. This has to be soaked with multiple players at the same time.
After soaking Brand of Damnation, Players struck will gain Emberscar’s Mark, increasing their damage taken by soaking again by 500%. This prohibits the same players to soak again.
Players struck will also gain Cauterizing Wound, dealing damage and absorbing a large amount of heal. Healers have to compensate this. Upon expiration, they spawn Cauterized Explosion, a voidzone on the floor that explodes for damage to players inside.
In Heroic, this also spawns Flame Waves.
Also in Heroic, the Tank will receive Searing Aftermath, causing a large explosion that deals damage to all players, reduced by the distance of the Tank to other players.
 Overheated
Several players will be affected by Overheated. This deals damage to all players around them in a 10-yard radius.
In Heroic, Flame Waves will spawn upon expiration, traveling in multiple directions that deals damage to other players hit and knocks them back.
 Lava Geysers
Frequently, Lava Geysers are spawned below the location of players. Getting struck deals heavy damage to players inside. Afterwards, these swirlies will spawn Smoldering Ground which remain permanent on the floor.
Blistering Heat
Throughout this encounter, Blistering Heat will deal damage to all players every few seconds. This has to be compensated by the Healer.
Intermission
Upon reaching 100 Energy, Smolderon runs into the middle of the area and starts his Intermission Phase. He gains Blazing Soul for 30 seconds, increasing the intensity of Blistering Heat by 300%, and in Heroic also its damage by 50%.
He also gains Heating Up, increasing his damage done by 10% for the rest of the encounter, and after reaching this intermission 6 times (4 times in Heroic), he wipes the raid with Encroaching Destruction.
 Devour Essence
At the start of the Intermission, Smolderon uses Devour Essence, knocking all players away. Players that were previously affected by Emberscar’s Mark will loose this debuff, and spawn Living Flame.
Living Flame can only be seen by players that spawned them. These Living Flame travel towards Smolderon and grant him a permanent damage buff. Players can walk through them themself to gain a temporary damage and healing buff.
 World in Flames
Smolderon then channels World in Flames, spawning alternating rings of fire that have to be dodged until the Intermission is over.
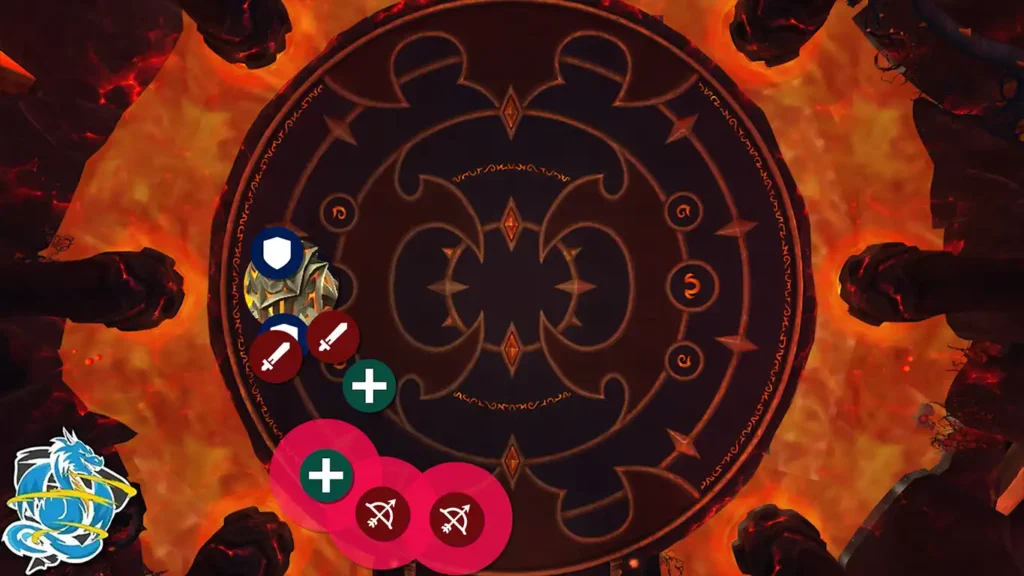
Move Smolderon to the outside. Spread out if affected by Overheated.
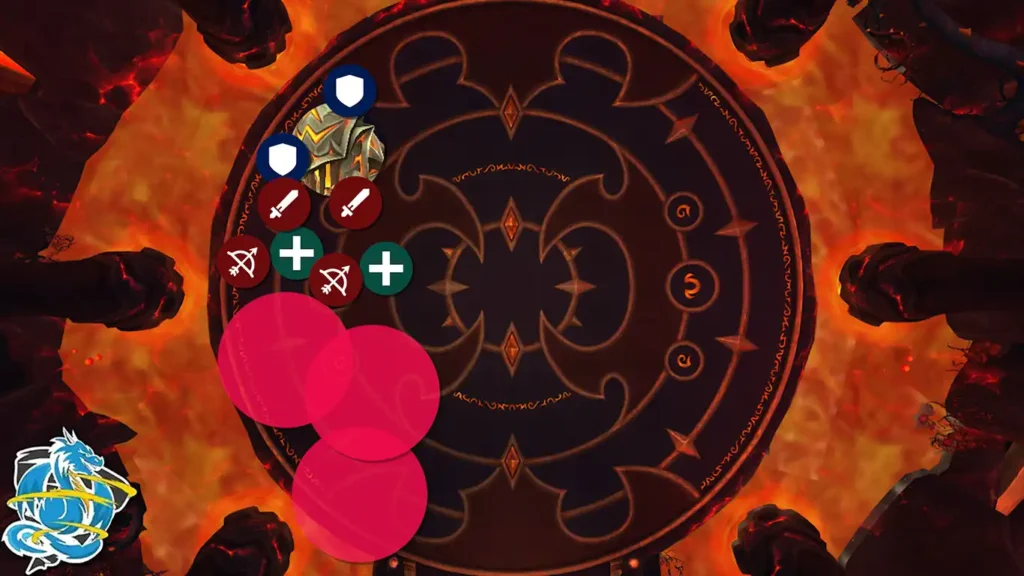
Continue moving the Boss along the outside whenever the place gets filled by Smoldering Ground.
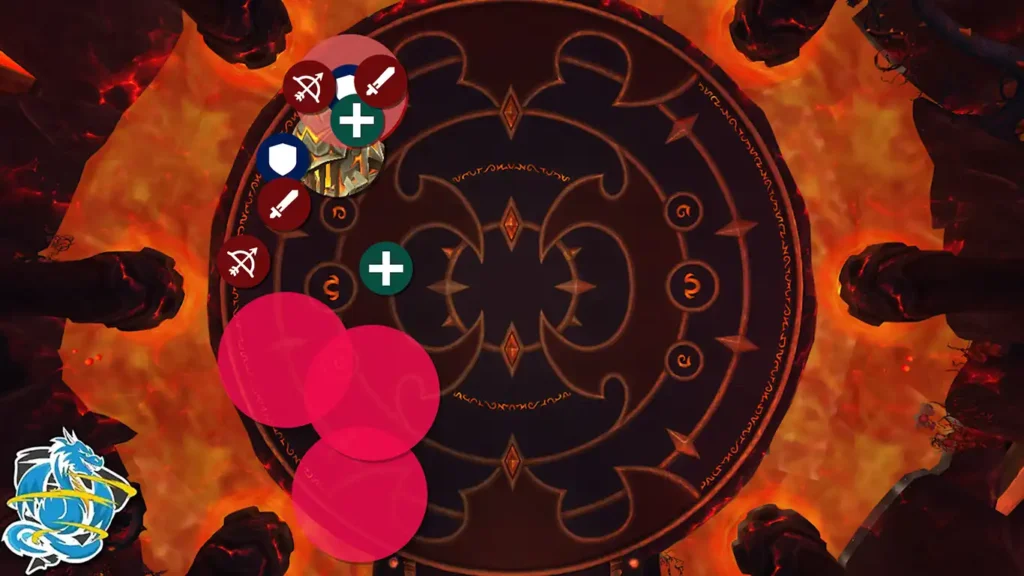
Help soaking the Brand of Damnation on the Tank, one group at a time.
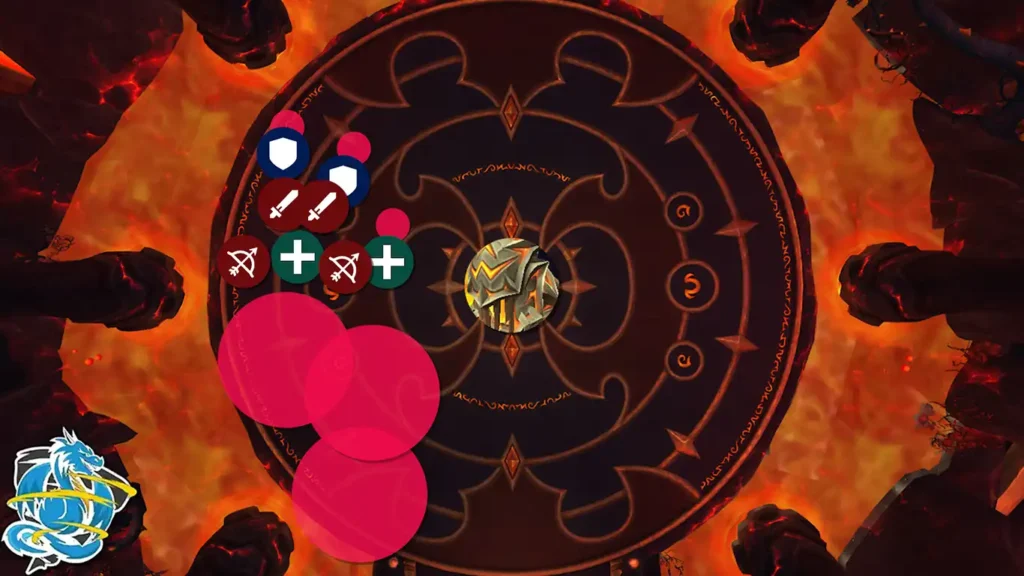
At the beginning of Phase 2, make sure to soak your own Living Flames.
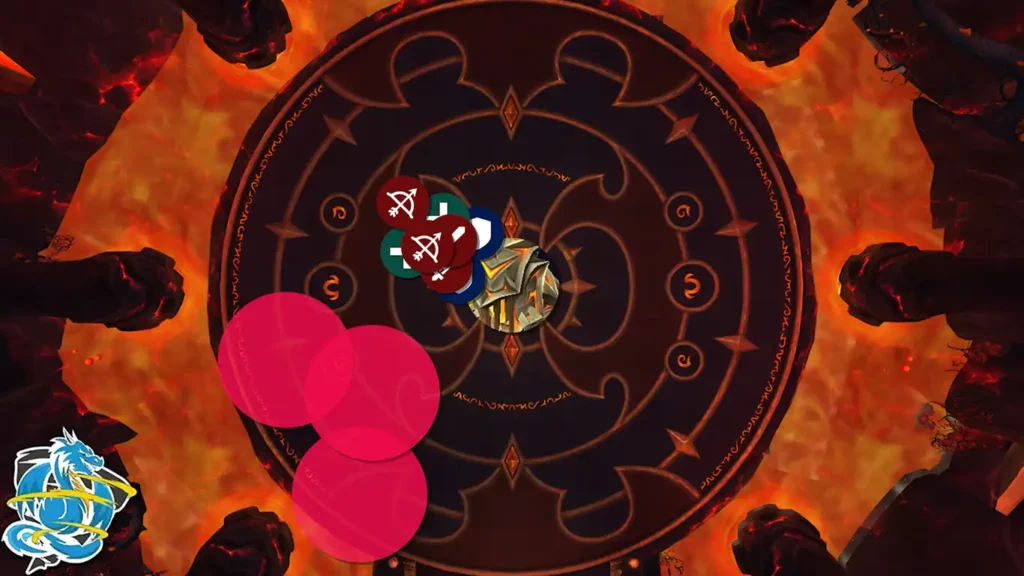
Stack up in Phase 2, and keep dodging the World in Flames rings.
Eigth Boss: Tindral Sageswift, Seer of the Flame
Notable Abilities
- Spread away from other Players when affected by Fiery Growth.
- Be fast riding your Dragonriding Mount to interrupt Supernova.
Changes in Heroic Mode
- Fire Beam spawns additional Beams each time.
- Stomping a Seed of Flame increases damage taken by stomping more of them.
Regular Abilities
 Mass Entanglement
Tindral will use Mass Entanglement, causing all players to be rooted until the roots are defeated.
This effect can be removed with abilities that removes root effects, but not snare effects.
 Falling Star
Frequently, several players will be affected by Falling Star which deals damage in a 9-yard radius upon impact.
This spawns Star Fragments, swirlies of all players that have to be dodged.
 Fiery Growth
Several players are getting affected by Fiery Growth, granting them a damage over time debuff.
Dispelling this debuff causes Scorching Ground to be spawned .
 Blazing Mushroom
Blazing Mushroom is a buff granted to Tindral, causing him to spawn Mushrooms over 9 seconds, every 3 seconds.
These Mushrooms must be soaked by the Tanks, alternating between each other. These Mushrooms grant the Players soaking a 500% damage taken increase debuff for 3 seconds.
Searing Wrath
Every auto-attack by Tindral causes Searing Wrath on the current target, causing his further melee attacks to deal additional damage. This debuff can stack.
Flame Surge
If players are too far on the edge of the platform, Flame Surge will deal deadly damage to them every 1 second.
Moonkin Abilities in Phase 1 and Phase 3
Sunflame
While in Moonkin Form, Tindral casts Sunflame on all players, dealing damage to them which has to be compensated by the Healer.
 Fire Beam
In his Moonkin Form, Tindral spawns Fire Beam which is indicated by a large red voidzone. Upon impact, this spawns several more Fire Beams which travel in all directions, gaining speed over time.
In Heroic, this spawns even more Fire Beams.
Treant Abilities in Phase 2 and Phase 3
Suppressive Ember
In Treant Form, Tindral affects several player with Suppressive Ember, granting them a large Healing Absorption which must be compensated by the Healer.
 Flaming Germination
While Tindral channels Flaming Germination, he deals damage to all players every 1 second. Additionally, he spawns Seed of Flame which must be run over by players.
If these Seed of Flames were not destroyed within 10 seconds, they spawn a Flaming Tree which deals periodic damage to all players until the end of the encounter.
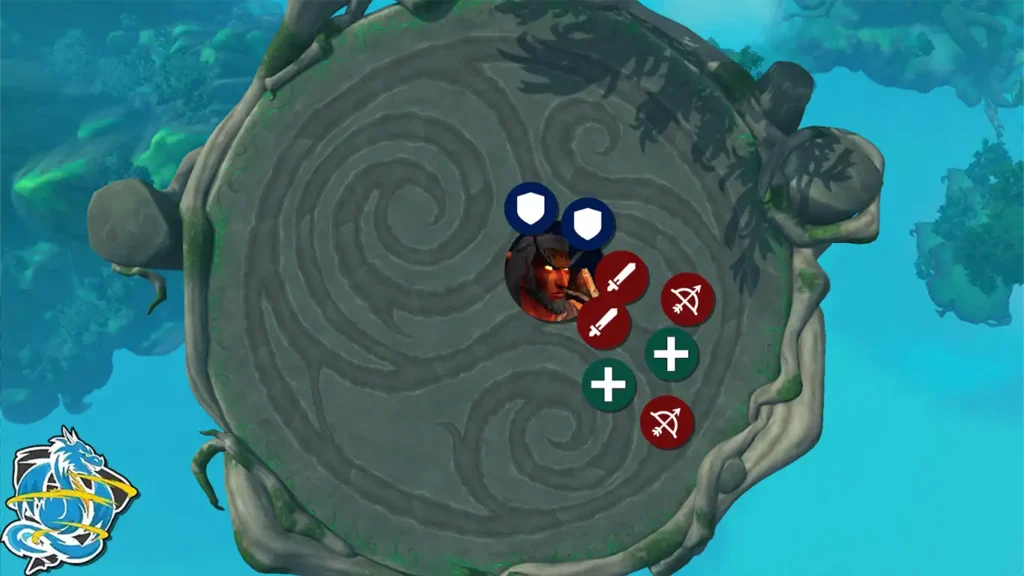
Stack slightly behind the Boss with your party members.
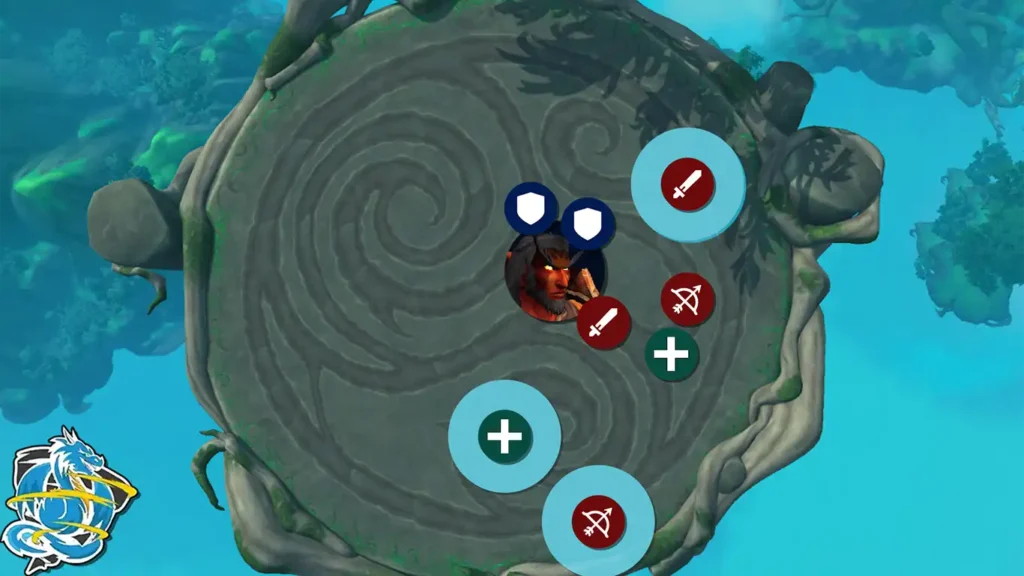
Spread away if affected by Falling Star.
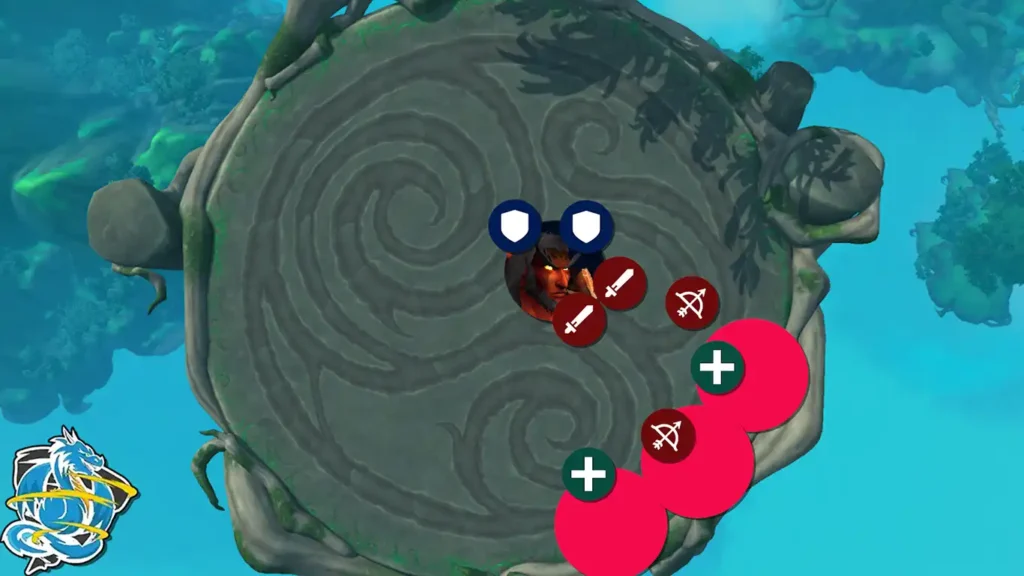
Move to the outside with Fiery Growth and get dispelled.
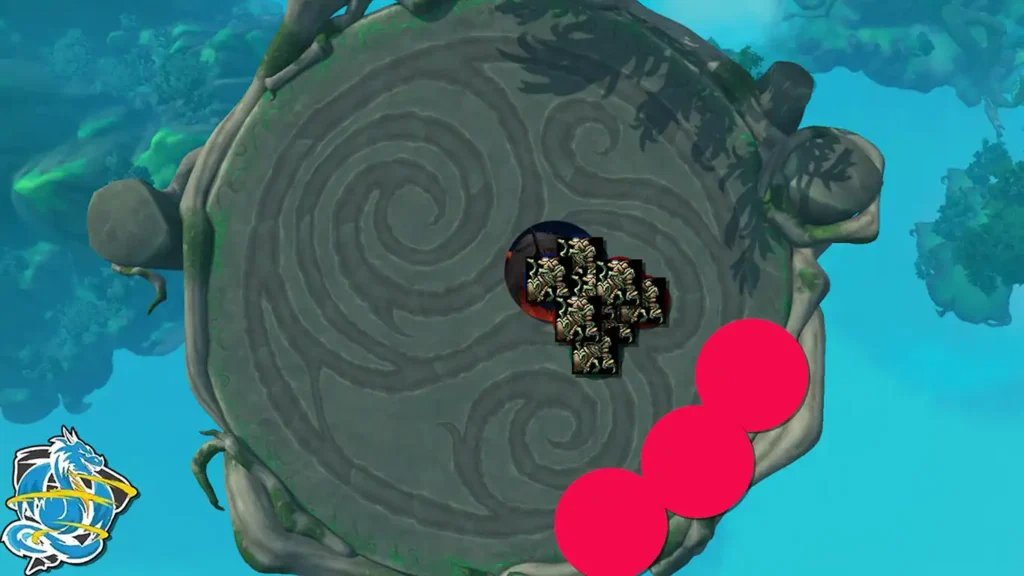
Stack up for Mass Entanglement.
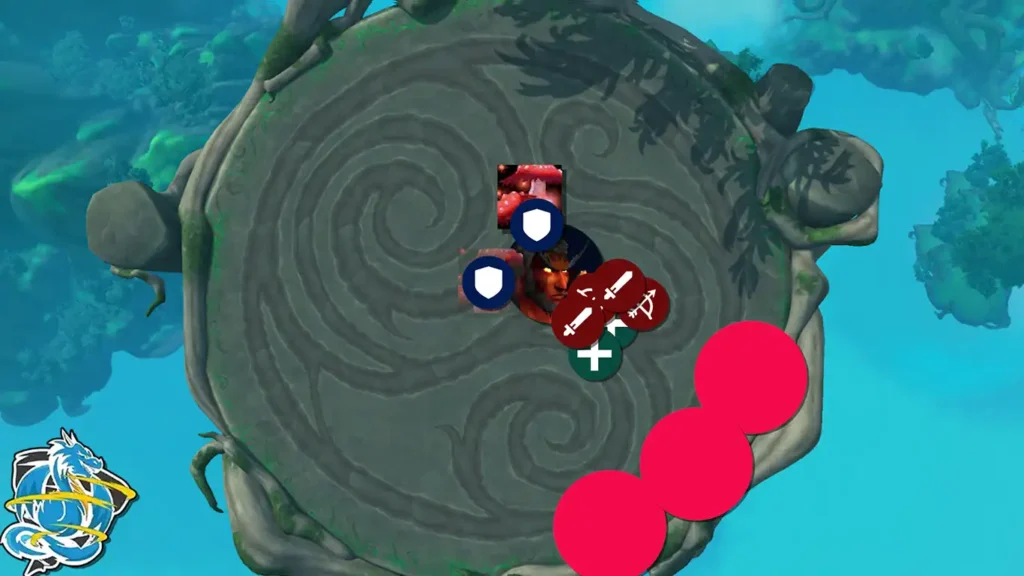
Tanks alternate soaking each Mushroom.
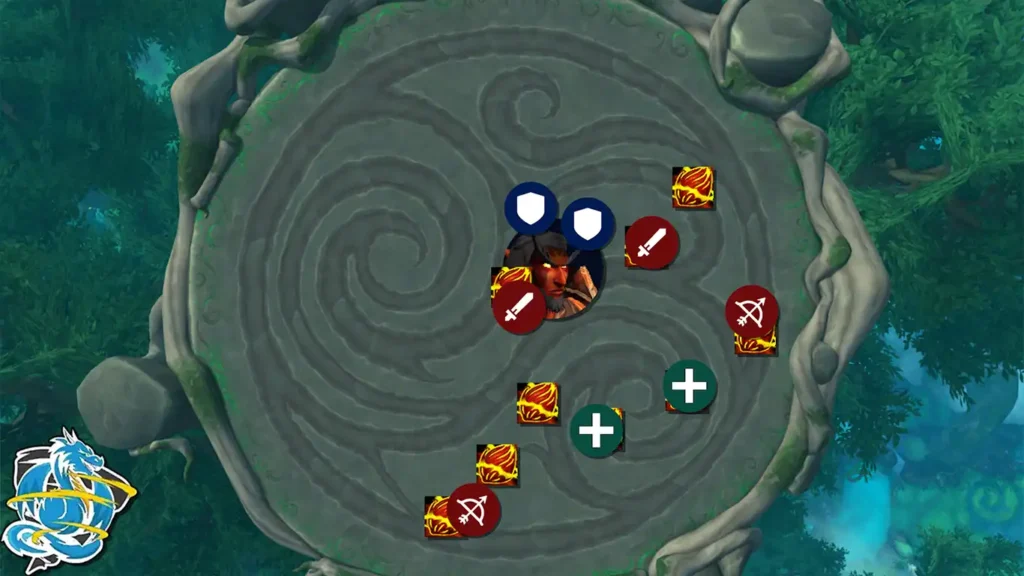
In Phase 2 and Phase 3, run over the Seed of Flame.
Final Boss: Fyrakk the Blazing
Notable Abilities
- Make sure that Raging Flames does not hit the Roots of Amirdrassil.
- Keep Spirits of Kaldorei healthy to heal Amirdrassil.
- Seeds of Amirdrassil can never be hit by any ability in the last phase.
Changes in Heroic Mode
- Blaze is a new ability in Heroic that causes several players to explode after 4 seconds.
- Raging Ember will use Consume Spirit to destroy Spirits of Kaldorei.
Phase 1
Roots of Amirdrassil
Close to Amirdrassil, four Roots of Amirdrassil will spawn at the start of the encounter which have to survive Phase 1, otherwise Amirdrassil Burns and the fight is over.
If the Roots are getting hit by Raging Flames, Amirdrassil is destroyed.
Firestorm
Fyrakk uses Firestorm, dealing damage to all players and Amirdrassil, which causes several swirlies to spawn that players have to dodge.
This spawns Raging Flames in a 9-yard radius, which shall never hit the Roots of Amirdrassil.
Whenever Fyrakk uses Wildfire, this spreads Raging Flames to nearby locations.
Dream Rend
Dream Rend causes all party members to take damage, and a Rift to the Firelands is spawned.
This pulls all players in, dealing less damage the further players are away from it.
Blaze
Blaze is a Heroic Only ability, which causes several players to explode in a small radius after 4 seconds.
Burning Presence
Fyrakk deals consistent damage with Burning Presence to all players, but can also set players Aflame.
Aflame is a debuff that deals even more periodic damage, but can be dispelled by Healer.
Fyralaths bite
Fyrakk uses Fyralaths bite on the current Tank, dealing heavy damage, and shooting a fireball of Fyralaths Flame in a random direction which deals damage to players struck.
This also applies Fyralaths Mark to the current Tank, increasing his damage taken from all attacks of Fyrakk. This effect stacks.
Predator
When the current Target is too far away from Fyrakk, he uses Predator to leap onto them.
Intermission
Incarnate
Fyrakk leaps into the sky and crashes onto the platform, dealing damage to all players and knocking them up.
Corrupt
He then starts trying to Corrupt Amirdrassil. If Amirdrassil is fully corrupted, your party will wipe.
He casts Shadowflame Breath onto Amirdrassil to destroy it. Standing in Shadowflame Breath deals deadly damage to players.
Interrupt Fyrakk after removing his absorption shield.
In the meantime, Shadowflame Orbs travel from the location of the Raging Flames towards Fyrakk, which increase his damage done.
Players must soak the Shadowflame Orbs before they reach him.
Burning Scales
Burning Scales replaces Burning Presence while Fyrakk is in Dragon form, dealing consistent damage to all players.
Phase 2
Fyrakk will still use Fyralaths bite, Predator, Burning Presence in this Phase, and in Heroic he still uses Blaze aswell.
Heart of Amirdrassil
The Heart of Amirdrassil is vulnerable in this Phase, causing a wipe if it is destroyed. To keep it healthy, Spirits of Kaldorei will sacrifice themself whenever they reach Amirdrassil.
Healers can heal the Spirits of Kaldorei to sacrifice even more Life back to Amirdrassil.
Greater Firestorm
Greater Firestorm replaces Firestorm in this Phase, also dealing party wide damage and spawning swirlies. Greater Firestorm will spawn a Burning Colossos which has to be defeated quickly, otherwise Exploding Core will deal deadly damage to all players.
Flamefall
Fyrakk leaps into the sky and uses Flamefall, crashing into the platform indicated by a large voidzone. Damage from Flamefall is reduced by the distance to the impact location.
Shadowflame Devastation
Fyrakk will deep breath across the platform, dealing deadly damage to players struck by it. This also spawns Raging Ember and Sreaming Soul adds. Raging Ember will cast Swelling Flames which deals party wide damage, increasing with each successful cast. In Heroic, they also Consume Spirit nearby Spirits of Kaldorei.
Sreaming Soul use Searing Screams, transforming nearby Spirits of Kaldorei into even more Sreaming Soul.
Phase 3
In this Phase, Fyrakk still uses Burning Presence and Blaze.
Infernal Maw
Infernal Maw replaces all Tank abilities in this Phase, dealing very heavy damage to the current Tank and applies a damage over time debuff to them until the end of the encounter.
Shadowflame Breath
Fyrakk uses Shadowflame Breath, similar to the Intermission Phase, in the direction of a random player.
Eternal Firestorm
Eternal Firestorm deals similar damage and spawns swirlies as previous Firestorm casts, but now spawns swirling firestorm from Amirdrassil which travel in random directions, dealing damage to players struck in its path.
Apocalypse Roar
Fyrakk uses Apocalypse Roar, dealing deadly damage to all players and set ever player Aflame–
This damage must be mitigated by the Absorption Shield caused by the Seed of Amirdrassil.
Seed of Amirdrassil
Seed of Amirdrassil will spawn along Amirdrassil, which can be carried by players.
This allows them frequently to Bloom, creating a 9-yard shield which absorbs 1 million damage per player inside of it for 6 seconds.
If a Seed of Amirdrassil is ever hit by any ability, they become Blazing Seed, causing your party to wipe.
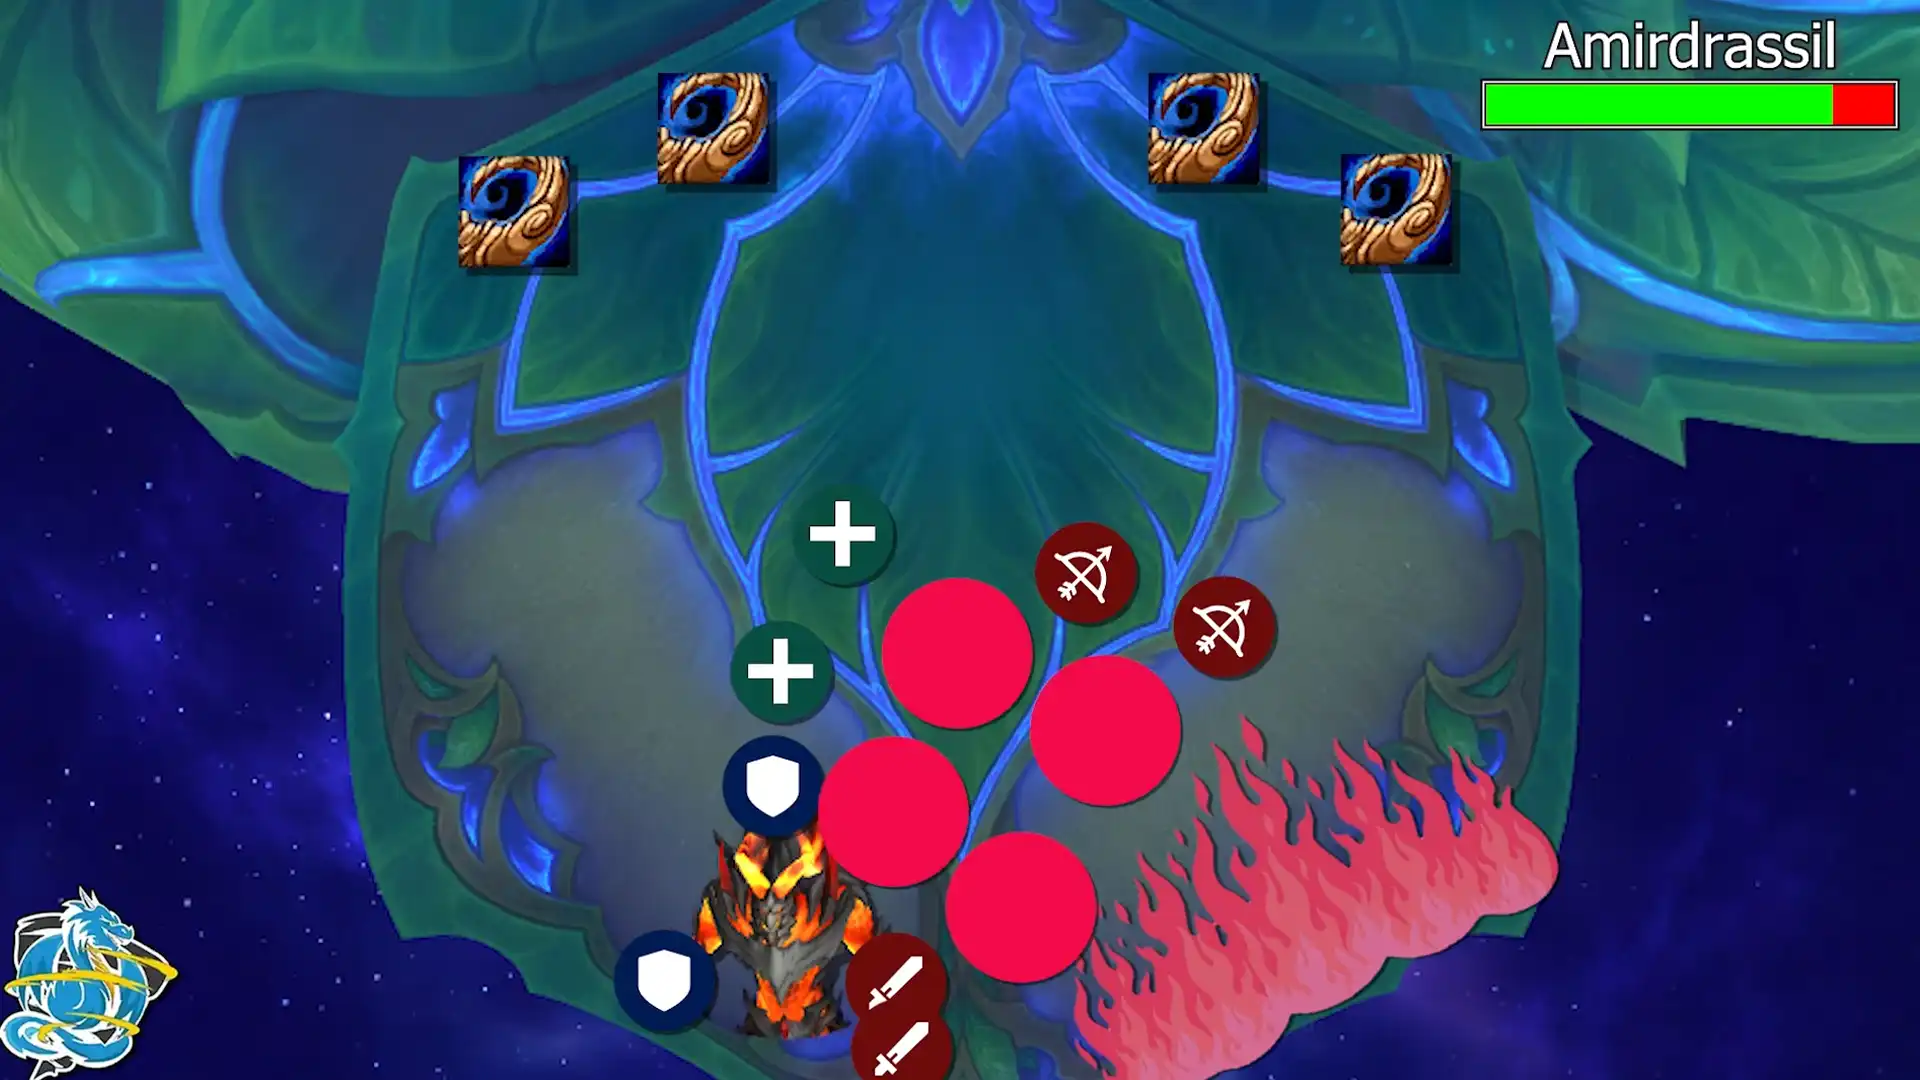
Position Raging Flame far away from Roots of Amirdrassil
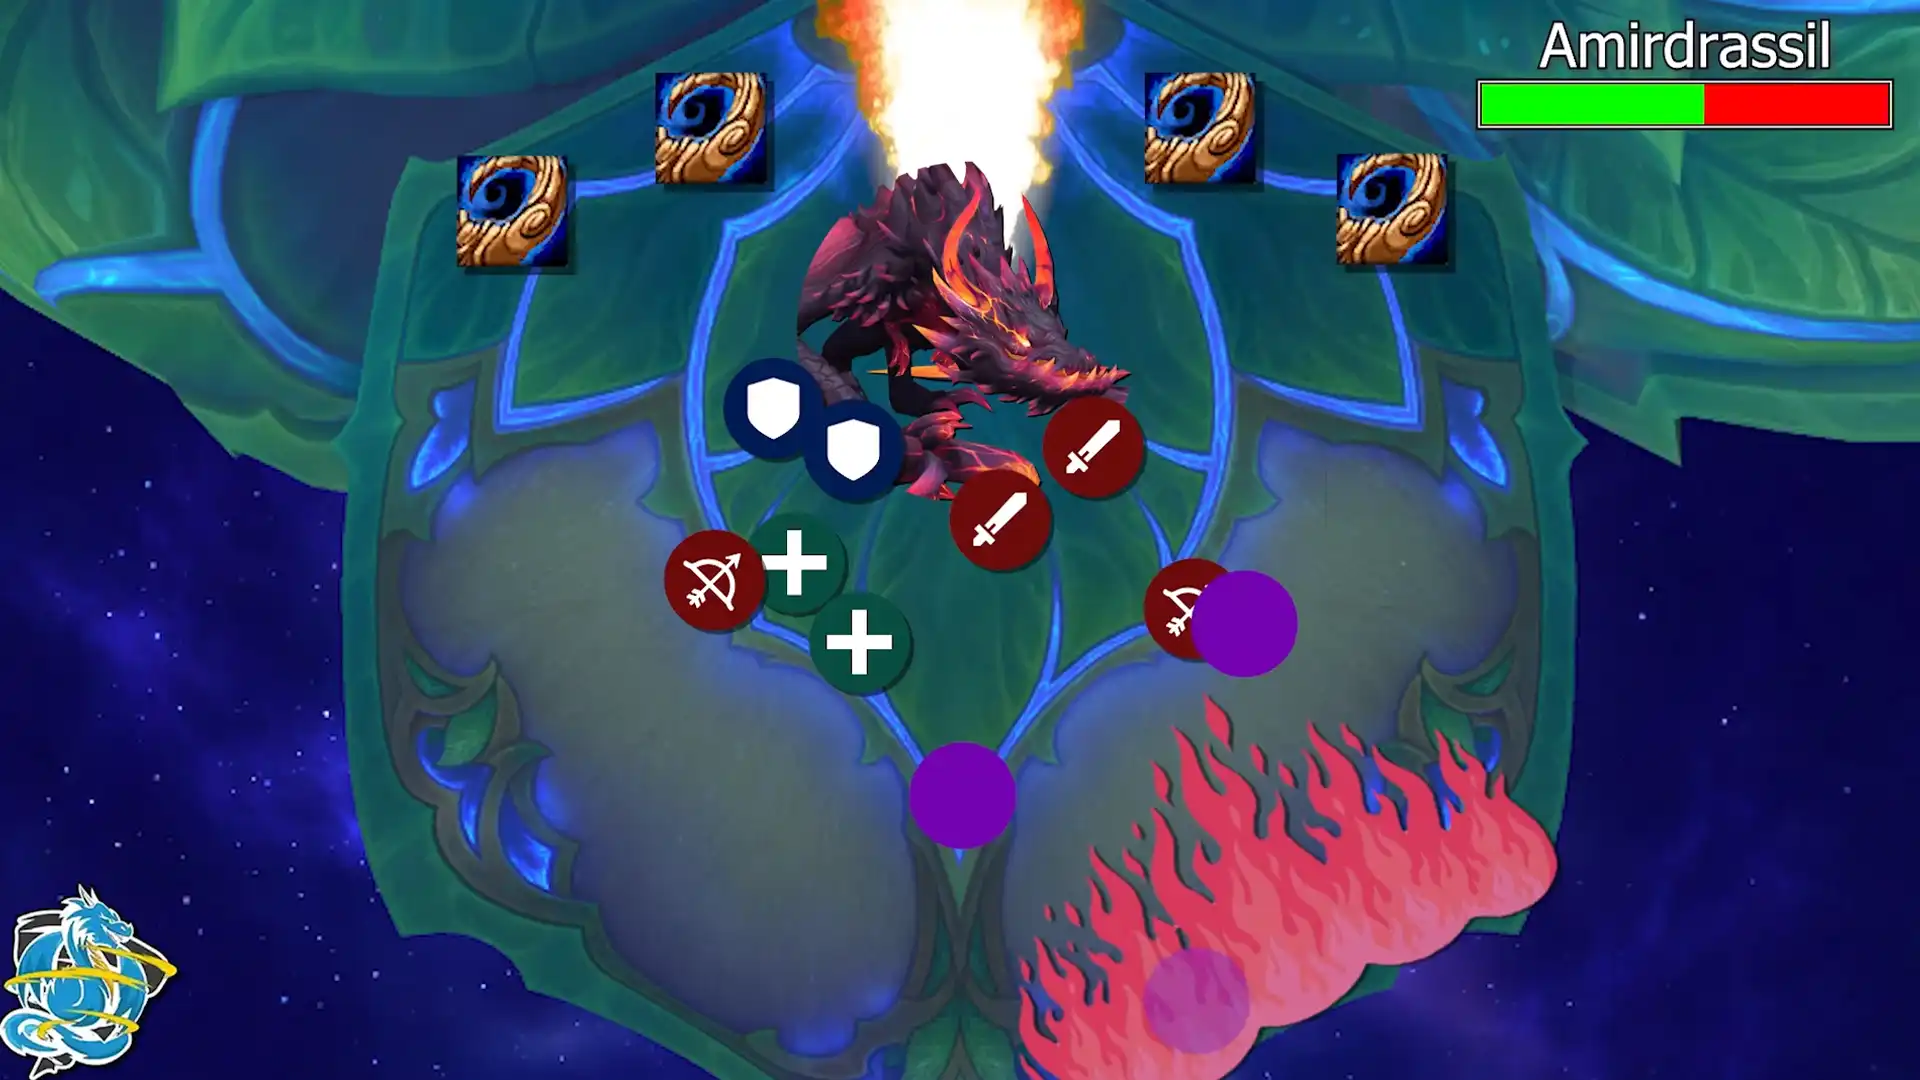
In Intermission, break the Absorption Shield and Soak the Shadow Orbs
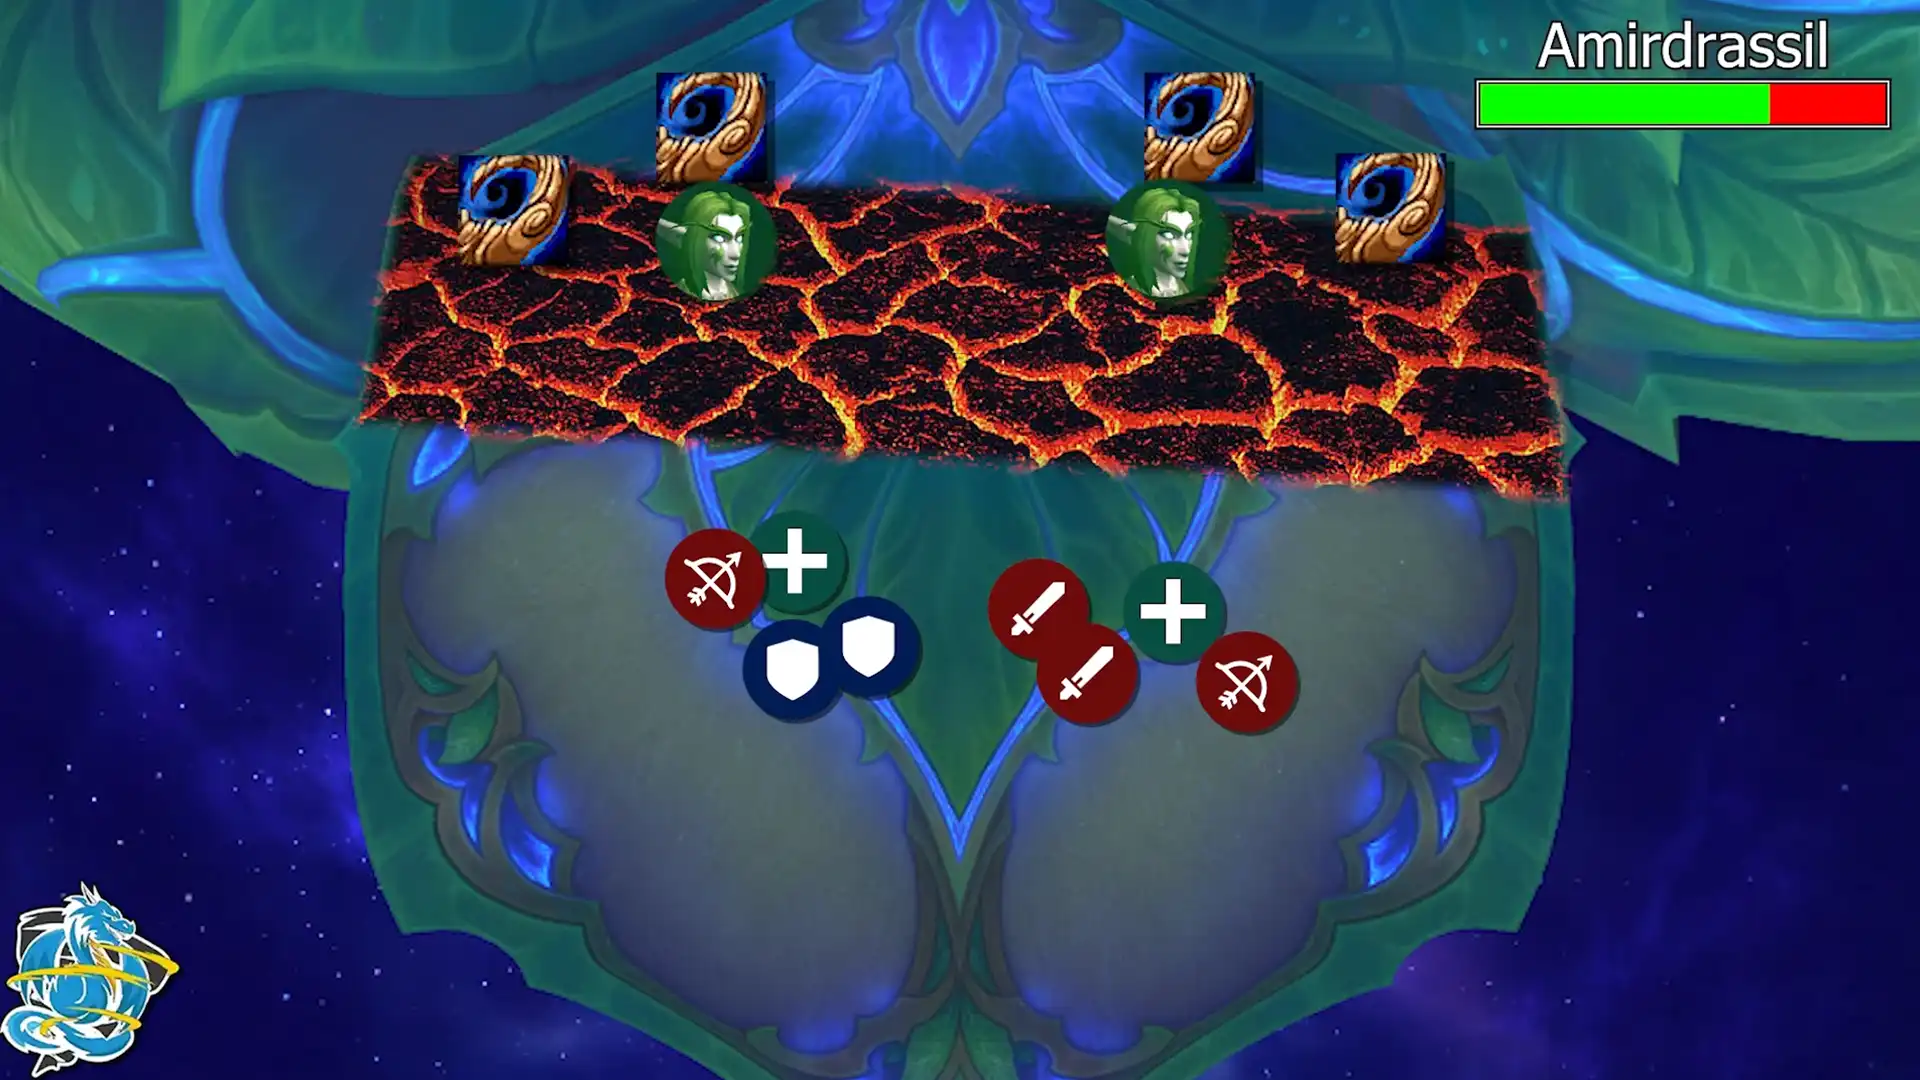
Keep Spirits of Kaldorei alive, dodge Deep Breath, kill Adds.